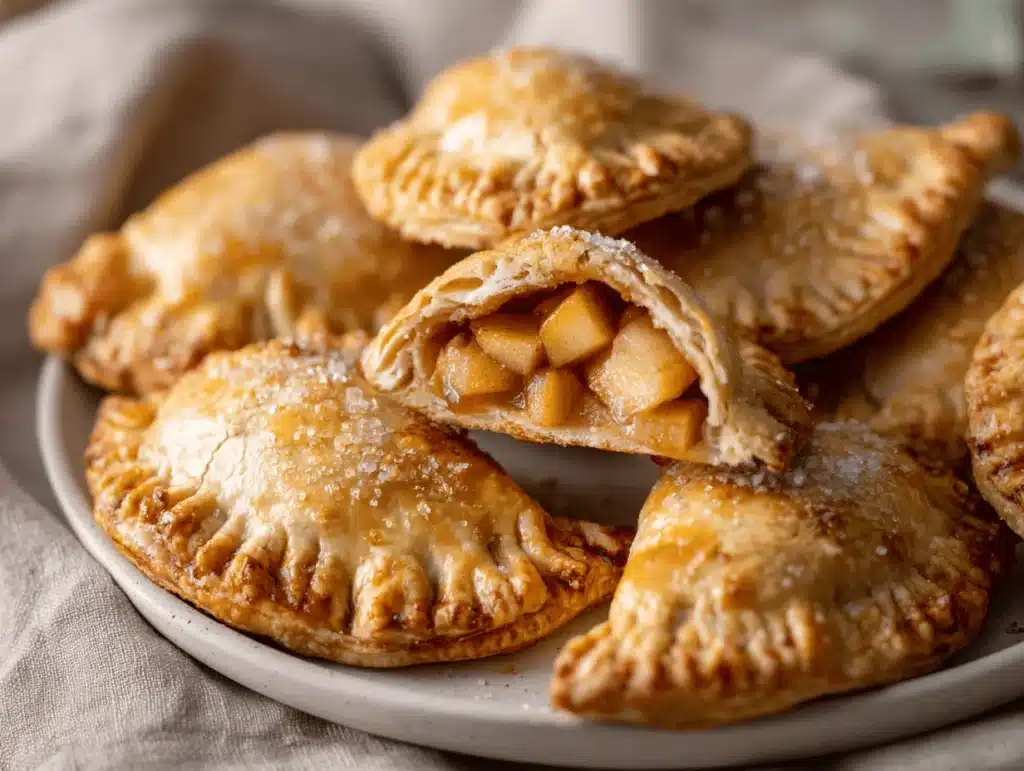
The first time I pulled a tray of golden, flaky apple hand pies from the oven, the whole kitchen filled with the smell of bubbling cinnamon apples and buttery pastry. My kids came running—no joke, they never move that fast except for dessert! Apple hand pies are honestly the snack I never knew I needed until I started baking for our local school bake sale. I wanted something portable, easy to eat, and absolutely irresistible. That’s how this apple hand pies recipe became my secret weapon for bake sales and afternoon snacks.
My grandma used to make big apple pies every fall, but these cute little hand pies are like the pie’s fun-loving cousin—no slicing, no fussing, just grab and go. I’ve tweaked and tested this recipe more times than I care to admit, searching for the perfect balance: crisp pastry, gooey apple filling, and just the right amount of spice. Whether you’re baking for a crowd, packing lunchbox treats, or stashing snacks for road trips, these apple hand pies always disappear fast.
If you love classic apple pie but crave something less messy, this is it. The dough is simple enough for beginners, and the filling is packed with real apples, a hint of lemon, and warm spices. Plus, you can make a batch ahead and freeze them—so handy! As someone who bakes with kids, trust me, these are always a hit (and the filling is forgiving, so little hands can help). This apple hand pies recipe is my go-to for busy weeks, bake sales, and cozy afternoons. Ready to fall in love with pie all over again?
Why You’ll Love This Recipe
After baking apple hand pies for bake sales, birthday parties, and just-because treats, I can say there’s something magical about this recipe. Here’s what sets it apart (and why I keep coming back to it):
- Quick & Easy: You’ll have a fresh batch ready in under an hour, perfect for last-minute cravings or when you forget about tomorrow’s bake sale until bedtime.
- Simple Ingredients: Everything comes from the pantry or fridge—no special trips for fancy stuff. Apples, flour, butter, sugar, and a few spices are all you need.
- Perfect for Bake Sales & Snacks: These hand pies are sturdy enough to pack, hold, and eat without utensils. I’ve sold dozens at bake sales, and they’re always the first to go!
- Crowd-Pleaser: Kids, adults, picky eaters—everyone grabs a second hand pie. The classic apple-cinnamon combo is universally loved.
- Unbelievably Delicious: The pie crust is flaky and golden, the apple filling is sweet-tart and gooey, and the whole thing just melts in your mouth. One bite and you get that warm, nostalgic apple pie feeling.
But here’s what makes this apple hand pies recipe a little different: I use a small dice for the apples, so the filling stays chunky but cooks evenly. I also chill the dough for just the right texture—no soggy bottoms here! You can get creative with the spices, and the pastry is forgiving if you’re not a pro at rolling dough. There’s something genuinely comforting about these hand pies—they’re familiar, but they feel special.
Honestly, I love how these hand pies turn an ordinary snack time into a mini celebration. Whether it’s the satisfying snap of the crust or the burst of warm apple filling, every bite feels like home. They’re the kind of treat that get eaten before they even cool down, and I never mind making a double batch. If you’re searching for a bake sale winner or just want to surprise your family, this recipe is the one you’ll reach for again and again.
Ingredients Needed
This apple hand pies recipe uses everyday ingredients to deliver classic flavors and that perfect pastry crunch. Here’s what you’ll need (and a few notes from my kitchen):
- For the Crust:
- 2 1/2 cups (310g) all-purpose flour
- 1 cup (226g) unsalted butter, cold and cubed (I like Kerrygold for extra richness)
- 1/4 cup (50g) granulated sugar (adds a touch of sweetness to the dough)
- 1/2 teaspoon salt
- 6-8 tablespoons (90-120ml) ice water (start with 6, add more if needed)
- For the Apple Filling:
- 2 medium apples (about 300g), peeled, cored, and diced small (Granny Smith for tartness, Honeycrisp for sweetness)
- 1/3 cup (70g) light brown sugar
- 1 tablespoon (8g) all-purpose flour (helps thicken the filling)
- 1/2 teaspoon ground cinnamon
- 1/8 teaspoon ground nutmeg
- 1/2 teaspoon lemon juice (brightens up flavors)
- Pinch salt
- For Assembly:
- 1 large egg, beaten (for egg wash)
- 1 tablespoon (12g) coarse sugar (for sprinkling, optional)
Ingredient Tips & Substitutions:
- Butter: Feel free to use plant-based butter for a dairy-free crust.
- Apples: Mix varieties for flavor depth, or swap with pears in the fall. If apples are extra juicy, add a little more flour to the filling.
- Flour: Substitute gluten-free all-purpose blend if needed (I’ve tried Bob’s Red Mill).
- Sugar: Coconut sugar works for a natural sweetener, though the flavor will be a bit deeper.
- Spices: Add a pinch of ginger or cardamom for a little twist, especially around the holidays.
- Egg wash: For vegan pies, brush with almond milk instead.
Honestly, you can riff on this filling all you want—add dried cranberries, chopped walnuts, or even a spoonful of caramel sauce if you’re feeling wild. Just keep the apple dice small so they cook evenly and don’t poke through the pastry.
Equipment Needed
You don’t need a fancy bakery setup to make apple hand pies. Here’s what I use (and a few swaps if you’re missing something):
- Mixing bowls: One large for dough, one medium for filling.
- Pastry cutter or forks: For cutting butter into flour. If you don’t have a pastry cutter, two forks or even your fingers work fine—just move quickly so the butter stays cold.
- Rolling pin: Essential for rolling out the dough. A wine bottle works in a pinch (been there!).
- Baking sheet: Lined with parchment paper for easy cleanup.
- Parchment paper or silicone baking mat: Keeps pies from sticking and makes transfer easy.
- Sharp knife or pastry wheel: For cutting out the hand pies.
- Pastry brush: For egg wash. You can use a clean paintbrush if needed.
- Measuring cups and spoons: Accuracy counts here, especially for the dough.
- Plastic wrap: For chilling the dough.
I’ve made these hand pies in a tiny apartment kitchen with just the basics, so don’t stress if you’re missing a gadget. My rolling pin has survived a few falls, yet it still gets the job done. Just keep your tools cold, handle the dough gently, and you’re golden.
Pro tip: If you use a pastry wheel, you’ll get those pretty crimped edges. But a fork pressed around the rim works just as well (and looks homemade in the best way).
Preparation Method

Let’s get right into how to make these apple hand pies. I promise—it’s mostly just mixing, rolling, and filling. Here’s my tried-and-true step-by-step:
- Prepare the Dough (15 minutes):
In a large bowl, combine 2 1/2 cups (310g) flour, 1/4 cup (50g) sugar, and 1/2 teaspoon salt. Add 1 cup (226g) cold butter cubes. Cut in butter with a pastry cutter (or two forks) until the mixture looks like coarse crumbs with some pea-sized pieces.
Drizzle 6 tablespoons (90ml) ice water over the mixture. Stir gently with a fork. If the dough seems dry, add another tablespoon or two, just until it starts clumping together. Press into a ball, flatten into a disk, wrap in plastic, and chill for at least 30 minutes.
Note: Chilling helps the crust stay flaky. Don’t skip this! - Make the Apple Filling (10 minutes):
Peel, core, and dice 2 medium apples (about 300g) into small cubes. In a medium bowl, toss apples with 1/3 cup (70g) brown sugar, 1 tablespoon (8g) flour, 1/2 teaspoon cinnamon, 1/8 teaspoon nutmeg, 1/2 teaspoon lemon juice, and a pinch of salt.
Tip: Small apple pieces cook faster and fit easily into the pies. - Roll Out the Dough (10 minutes):
On a floured surface, roll dough to about 1/8 inch (3mm) thickness. If dough cracks, let it rest a few minutes to soften. Cut out circles (about 4-5 inches/10-12cm wide). Re-roll scraps as needed—don’t worry about perfect circles! - Fill and Seal the Pies (10 minutes):
Place a spoonful (about 1 tablespoon/15g) apple filling in the center of each circle. Brush edges lightly with beaten egg. Fold over to make a half-moon. Press edges firmly with a fork to seal.
Warning: Don’t overfill, or the pies might burst while baking. - Prepare for Baking (5 minutes):
Arrange pies on a parchment-lined baking sheet. Cut a small slit or poke a few holes in each pie for steam to escape. Brush tops with egg wash. Sprinkle with coarse sugar if you like crunch. - Bake (18-22 minutes):
Bake at 400°F (200°C) for 18-22 minutes, until golden brown and crisp. Check at 15 minutes—rotate the pan if needed for even coloring.
Sensory cue: You’ll smell the apples and see bubbling juices at the edges when they’re ready. - Cool & Serve:
Let pies cool on a wire rack for at least 15 minutes. The filling will set up as they cool, making them easier to eat. Good luck waiting!
If you run into trouble (like leaking filling or tough dough), don’t panic. I’ve had pies ooze and crusts crack, but they still taste amazing. The secret is chilled dough and gentle handling—plus, imperfect pies have character.
Cooking Tips & Techniques
Here are my best apple hand pie tips, learned after dozens of bake sale batches (and a few kitchen disasters):
- Keep everything cold: Cold butter = flaky pastry. If your kitchen’s warm, chill your bowl and rolling pin too.
- Don’t skimp on chilling: If you rush the dough, it gets sticky and hard to work with. Thirty minutes is minimum; longer is better.
- Don’t overwork the dough: Mix just until it comes together. Overmixing makes the pastry tough instead of tender.
- Use small apple dice: Big chunks won’t cook through by the time the pastry browns.
- Seal edges well: A little egg wash and a firm fork press keep the filling inside. If you see gaps, pinch them closed before baking.
- Vent the pies: Always cut a slit or poke holes before baking, or your pies may puff up and burst.
- Rotate the pan: If your oven has hot spots (mine sure does), turn the baking sheet halfway through for even browning.
- Let them cool: Hot filling will spill out if you rush. Give pies at least 15 minutes after baking before serving.
My early attempts at hand pies had leaky fillings and chewy crusts (I used melted butter once—yikes). But with practice, I found that patience and cold ingredients are your best friends. If your pies look rustic, that’s part of the charm—homemade is always better!
Multitasking tip: While the dough chills, make the filling and prep your baking sheet. That way, you’re ready to assemble as soon as the dough is ready.
Variations & Adaptations
Apple hand pies are the perfect canvas for creativity! Here are some of my favorite twists (and how to adapt for different diets or tastes):
- Gluten-Free: Swap the flour for a gluten-free all-purpose blend. Add 1/2 teaspoon xanthan gum if your blend doesn’t include it. I’ve had great results with King Arthur’s mix.
- Vegan: Use plant-based butter in the crust and brush pies with almond or oat milk instead of egg wash. Make sure your sugar isn’t processed with bone char (some organic brands are vegan-friendly).
- Flavor Boosts: Add a handful of dried cranberries or chopped pecans to the apple filling. For fall, throw in a pinch of cardamom or ginger.
- Berry Pies: Replace half the apples with diced strawberries, blueberries, or raspberries for a fresh twist. Use a little extra flour to absorb berry juices.
- Caramel Apple: Drizzle a little caramel sauce inside before sealing for a gooey surprise. (Kids love this, but the pies may leak a bit more—just embrace it!)
- Different Cooking Methods: Air fry at 375°F (190°C) for 10-12 minutes for a crispier crust. Or pan-fry in a little oil for a rustic finish.
One of my personal favorites? Adding diced pears and a touch of ginger to the filling—so good for winter! If you have nut allergies in your crowd, skip the nuts or swap with seeds like pumpkin for texture. These pies are endlessly adaptable, so don’t be afraid to experiment.
Serving & Storage Suggestions
Apple hand pies are best served warm, straight from the oven. For bake sales, I let them cool, then wrap individually in wax paper or tuck into paper sleeves—makes them easy to grab and go.
- Serving Temperature: Warm is classic, but room temp is also delicious. For brunch, serve with a scoop of vanilla ice cream or a dollop of whipped cream.
- Presentation: Stack on a rustic platter, or line up in a basket for bake sales. Pretty napkins or paper doilies make them pop for Pinterest photos.
- Complementary Dishes: Pair with hot apple cider, strong coffee, or a mug of chai. For breakfast, add a bowl of yogurt and fresh fruit.
- Storage: Store cooled pies in an airtight container at room temperature for up to 2 days. For longer storage, refrigerate up to 5 days.
- Freezing: Freeze baked pies in a single layer, then transfer to a freezer bag. Reheat from frozen at 350°F (175°C) for 10-15 minutes, or microwave for 30 seconds (the oven keeps the crust crispier).
- Flavor Development: The spices mellow and meld overnight, so leftover pies taste even better the next day.
Honestly, I’ve tucked these into lunchboxes, picnic baskets, and even my purse for road trips. They hold up well, and if you reheat in the oven, they taste freshly baked again!
Nutritional Information & Benefits
Here’s a quick breakdown of what you’re getting in each apple hand pie (approximate values per pie, assuming 10 pies per batch):
- Calories: 200-220
- Carbohydrates: 28g
- Fat: 10g
- Protein: 2g
- Fiber: 2g
- Sugar: 12g
Apples are a great source of vitamin C, fiber, and antioxidants. Using real fruit means you get natural sweetness and a little nutrition boost. The moderate sugar and fat are balanced by the wholesome ingredients, and you can tweak the recipe for lower sugar or dairy-free options. These pies contain gluten and eggs, so keep that in mind for allergies—but they’re easy to adapt!
From my own wellness perspective, I love having a treat that feels homemade and nourishing, not just sugary. And let’s face it, you know exactly what’s in these—no mystery ingredients!
Conclusion
If you’re looking for a bake sale superstar or just a cozy afternoon treat, this apple hand pies recipe is worth every minute. It’s easy, fun, and always brings smiles—whether you’re making them for friends or sneaking one for yourself.
Don’t be afraid to riff on the filling or swap ingredients to fit your taste. For me, hand pies capture all the comfort of classic apple pie with none of the fuss, and I love how portable and snackable they are. They’ve become a family staple and a bake sale favorite—honestly, I get asked for the recipe almost every time.
If you try these apple hand pies, drop a comment below or share your own twists—I’d love to see what you come up with! Bake, share, and enjoy every bite (and don’t forget to save one for yourself… they go fast!).
FAQs
Can I make apple hand pies ahead of time?
Yes! You can assemble them and chill overnight, then bake fresh the next day. Baked pies also freeze well for up to 2 months.
How do I keep the filling from leaking?
Don’t overfill and always seal the edges tightly with a fork. Adding flour to the filling helps soak up excess juices.
Which apples are best for hand pies?
I like Granny Smith for tartness and Honeycrisp for sweetness. Mixing varieties gives great flavor, but any firm baking apple works.
Can I use store-bought pie dough?
Absolutely! If you’re short on time, premade dough saves a step. Homemade crust tastes best, but store-bought works in a pinch.
Are apple hand pies suitable for kids’ snacks?
Yes, they’re perfect for lunchboxes and after-school treats. Just be sure to let them cool so the filling isn’t too hot!
Pin This Recipe!


Apple Hand Pies
- Total Time: 50 minutes
- Yield: 10 hand pies 1x
Description
These easy homemade apple hand pies feature a flaky, buttery crust and a gooey cinnamon apple filling, making them perfect for bake sales, snacks, or lunchboxes. Portable and crowd-pleasing, they’re a fun twist on classic apple pie with no slicing required.
Ingredients
- 2 1/2 cups all-purpose flour
- 1 cup unsalted butter, cold and cubed
- 1/4 cup granulated sugar
- 1/2 teaspoon salt
- 6–8 tablespoons ice water
- 2 medium apples (about 1 1/4 cups diced), peeled, cored, and diced small
- 1/3 cup light brown sugar
- 1 tablespoon all-purpose flour
- 1/2 teaspoon ground cinnamon
- 1/8 teaspoon ground nutmeg
- 1/2 teaspoon lemon juice
- Pinch salt
- 1 large egg, beaten (for egg wash)
- 1 tablespoon coarse sugar (optional, for sprinkling)
Instructions
- In a large bowl, combine flour, sugar, and salt. Add cold butter cubes and cut in with a pastry cutter or forks until mixture resembles coarse crumbs with pea-sized pieces.
- Drizzle 6 tablespoons ice water over the mixture and stir gently. Add more water if needed until dough starts to clump. Press into a ball, flatten into a disk, wrap in plastic, and chill for at least 30 minutes.
- Peel, core, and dice apples into small cubes. In a medium bowl, toss apples with brown sugar, flour, cinnamon, nutmeg, lemon juice, and a pinch of salt.
- On a floured surface, roll dough to about 1/8 inch thickness. Cut out circles about 4-5 inches wide. Re-roll scraps as needed.
- Place about 1 tablespoon apple filling in the center of each dough circle. Brush edges lightly with beaten egg. Fold over to make a half-moon and press edges firmly with a fork to seal.
- Arrange pies on a parchment-lined baking sheet. Cut a small slit or poke holes in each pie for steam to escape. Brush tops with egg wash and sprinkle with coarse sugar if desired.
- Bake at 400°F for 18-22 minutes, until golden brown and crisp. Rotate pan halfway through if needed.
- Let pies cool on a wire rack for at least 15 minutes before serving.
Notes
Keep ingredients and equipment cold for the flakiest pastry. Chill dough for at least 30 minutes. Don’t overfill pies to prevent leaking. Seal edges well and vent pies before baking. For gluten-free or vegan adaptations, use appropriate substitutes. Pies can be frozen and reheated for later enjoyment.
- Prep Time: 30 minutes
- Cook Time: 20 minutes
- Category: Dessert
- Cuisine: American
Nutrition
- Serving Size: 1 hand pie
- Calories: 210
- Sugar: 12
- Sodium: 90
- Fat: 10
- Saturated Fat: 6
- Carbohydrates: 28
- Fiber: 2
- Protein: 2
Keywords: apple hand pies, bake sale, apple pie, portable dessert, snack, easy pastry, kid-friendly, homemade, fall baking, lunchbox treat