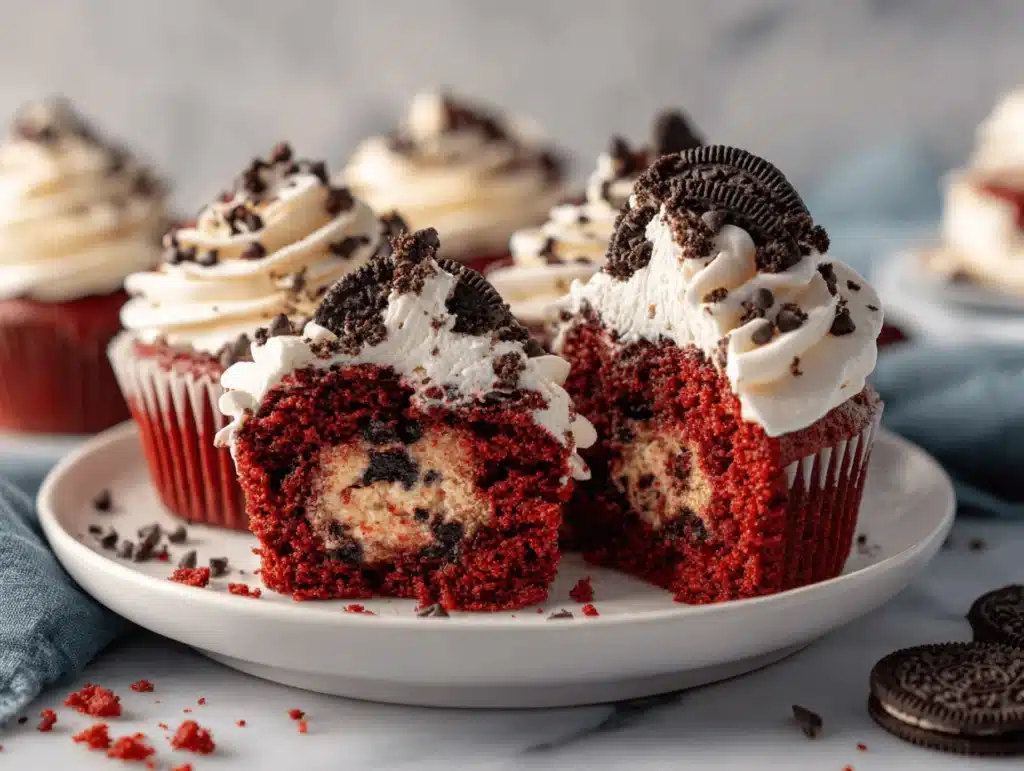
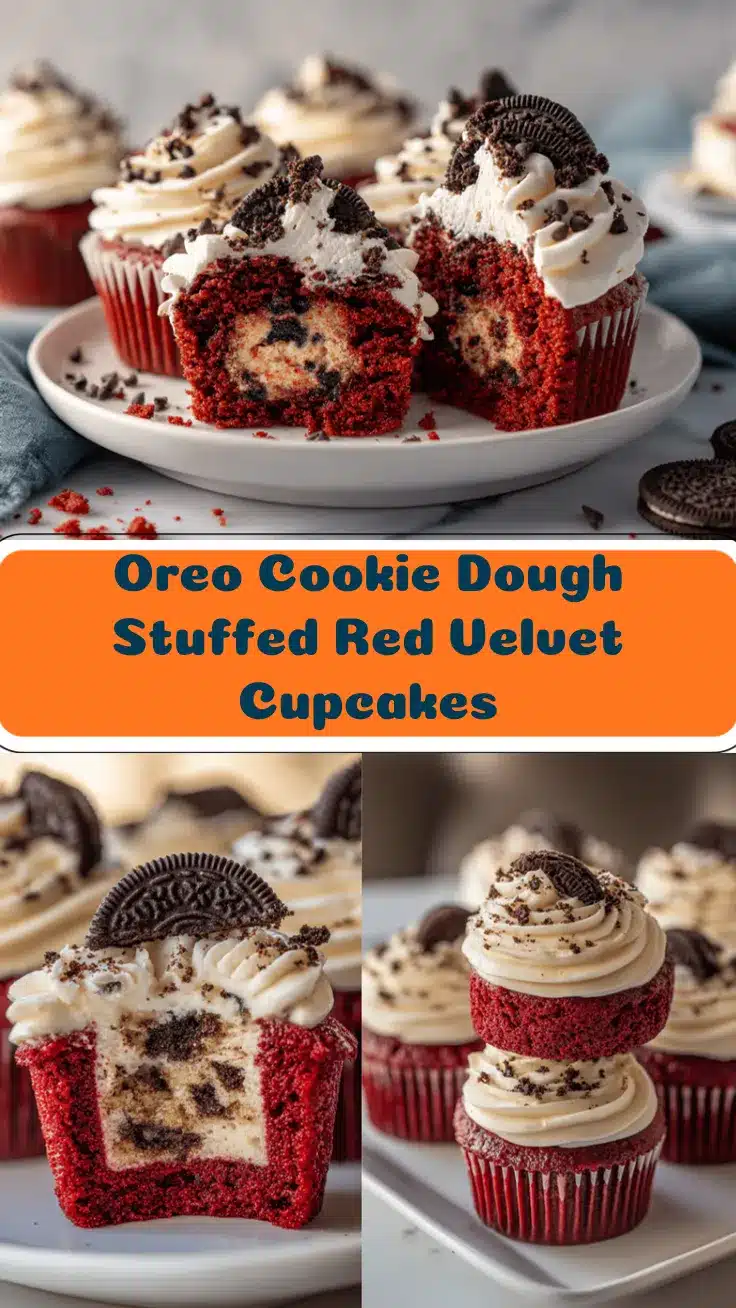
Imagine biting into a soft, crimson cupcake and discovering a gooey Oreo cookie dough center, bursting with chocolatey surprises and creamy richness. Honestly, the first time I made Oreo Cookie Dough Stuffed Red Velvet Cupcakes, the kitchen smelled like a cross between a bakery and a candy shop—pure heaven! The idea came to me on a rainy Sunday when I had leftover red velvet batter and a half-eaten pack of Oreos (don’t judge, sometimes you just need a snack while baking). I’ve always loved experimenting with classic flavors, and stuffing cupcakes with cookie dough felt like the ultimate treat. These cupcakes are not only visually stunning—think Pinterest-perfect swirls of frosting and chocolate drizzle—but they’re also ridiculously decadent and fun to make.
Red velvet has held a special spot in my heart since my grandma used to bake it for birthdays, but adding Oreo cookie dough transforms it into something even more magical. The balance of the tangy cocoa cake with the sweet crunch of cookie dough is, well, irresistible. Whether you’re planning a birthday party, a cozy night in, or just want to impress your friends with a showstopping dessert, this recipe brings the wow-factor every single time. You’ll love how easy it is to pull together (I’ve tested and tweaked it more times than I can count!), and it’s perfect for anyone who wants a homemade treat that’s a little over-the-top. Trust me, once you taste the combination of Oreo and red velvet, you’ll wonder why you ever baked cupcakes any other way.
This recipe is great for busy families, college students, or anyone craving a sweet escape. As someone who’s obsessed with baking, I can say these Oreo Cookie Dough Stuffed Red Velvet Cupcakes have become my go-to for celebrations—and let’s face it, for those random Tuesday nights when dessert is absolutely necessary.
Why You’ll Love These Oreo Cookie Dough Stuffed Red Velvet Cupcakes
- Quick & Easy: Ready in under an hour, these cupcakes are perfect for last-minute cravings or when you need a stunning dessert with minimal fuss.
- Simple Ingredients: You probably have most of what you need in your pantry right now—no fancy shopping trips required!
- Perfect for Celebrations: Whether it’s a birthday, Valentine’s Day, or just a sweet craving, these cupcakes add a splash of color and fun to any table.
- Crowd-Pleaser: Kids and adults alike go wild for the surprise cookie dough center. Every bite is a little adventure.
- Unbelievably Delicious: The combination of tangy red velvet, creamy Oreo cookie dough, and fluffy frosting is pure comfort food bliss.
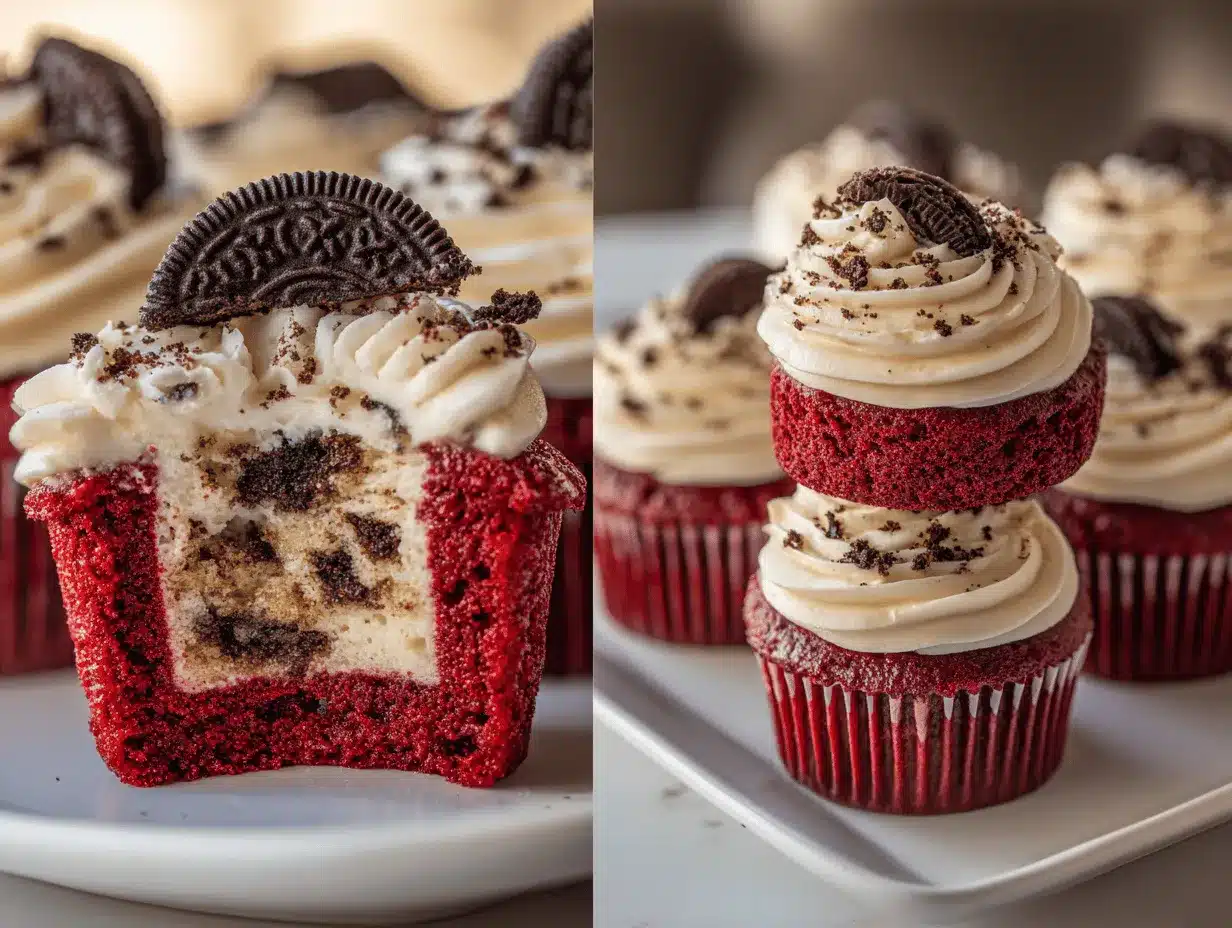
What sets these cupcakes apart from the usual red velvet? It’s all about that gooey surprise inside. By making a quick cookie dough with crushed Oreos, you get a super soft, almost molten center that stands out against the classic cake. I’ve tried lots of stuffed cupcakes, but this technique—rolling small balls of Oreo cookie dough and freezing them before baking—guarantees a melt-in-your-mouth middle that never dries out. You’ll get that signature Oreo crunch plus the soft, creamy dough every time.
I’ve made these for baby showers, bake sales, and just-because weekends, and they always disappear fast. The cupcake itself has a velvety, buttery crumb (thanks to buttermilk and a touch of vinegar), and the cookie dough center is a total game-changer. If you love desserts that make people smile and ask for seconds, this is the one. It’s indulgent, playful, and just a little bit rebellious—exactly how dessert should be!
Ingredients Needed
This recipe brings together pantry staples and a few special treats to deliver bold flavor and show-stopping texture. You don’t need anything fancy, and most ingredients are easy to substitute if you’re in a pinch. Here’s what you’ll need:
For the Red Velvet Cupcake Batter:
- 1 1/4 cups (155g) all-purpose flour
- 1/4 cup (30g) unsweetened cocoa powder (Dutch-process gives a deeper color)
- 3/4 cup (150g) granulated sugar
- 1/2 teaspoon baking soda
- 1/2 teaspoon salt
- 1/2 cup (120ml) vegetable oil (for moisture and richness)
- 2 large eggs, room temperature
- 1/2 cup (120ml) buttermilk, room temperature (for that classic tang)
- 1 teaspoon vanilla extract
- 1 teaspoon white vinegar (helps the color pop!)
- 2 tablespoons (30ml) red food coloring (gel or liquid)
For the Oreo Cookie Dough Filling:
- 1/2 cup (115g) unsalted butter, softened
- 1/3 cup (66g) packed brown sugar
- 1/4 cup (50g) granulated sugar
- 1 teaspoon vanilla extract
- 2 tablespoons (30ml) milk (dairy or non-dairy)
- 1 cup (125g) all-purpose flour (heat-treated for safety)
- 10 Oreo cookies, crushed (about 1 cup)
- 1/4 teaspoon salt
For the Cream Cheese Frosting:
- 8 oz (226g) cream cheese, softened
- 1/4 cup (60g) unsalted butter, softened
- 2 cups (240g) powdered sugar, sifted
- 1 teaspoon vanilla extract
- Pinch of salt
Optional Garnishes:
- Extra Oreo crumbs (for sprinkling)
- Mini Oreos (for topping)
- Chocolate drizzle (melted chocolate chips work great)
Ingredient Notes & Substitutions:
- For gluten-free: Swap the flour for a 1:1 gluten-free blend. Almond flour works for cookie dough but not for the cupcakes.
- No buttermilk? Mix 1/2 cup milk with 1 tablespoon vinegar or lemon juice and let sit for 5 minutes.
- Dairy-free: Use vegan butter and plant-based milk in both batter and filling—I’ve tried it, and it works!
- Brand tip: I love using Nabisco Oreos for consistency, but store brands work fine.
- Food coloring: Gel gives brighter color, but liquid is okay in a pinch.
All these ingredients come together to create cupcakes that are both beautiful and crave-worthy. If you have kids around, let them help crush the Oreos—it’s messy, but so much fun!
Equipment Needed
- Muffin tin (12-cup): Standard size works best for even baking.
- Paper cupcake liners: Keeps things tidy and helps with easy removal.
- Mixing bowls: At least two—one for dry and one for wet ingredients.
- Hand mixer or stand mixer: Makes creaming butter and mixing batter less of an arm workout.
- Spatula: For scraping down the bowls (I find silicone ones easiest to clean).
- Ice cream scoop or cookie scoop: For portioning cupcake batter and shaping dough balls—honestly, a spoon works if you don’t have one.
- Measuring cups and spoons: Accuracy is key for red velvet!
- Baking sheet: For freezing cookie dough balls before stuffing.
- Piping bag and tip (optional): For fancy frosting swirls, but a zip-top bag with the corner snipped off does the job too.
I’ve used everything from old hand-me-down mixers to budget-friendly measuring sets, and these cupcakes always turn out. If you don’t have a cookie scoop, just roll the dough with your hands—imperfections make every cupcake unique. Keep your muffin tin in good shape by washing it right after baking (red velvet can stain if left too long!).
Preparation Method
-
Make the Oreo cookie dough filling:
In a medium bowl, cream together 1/2 cup (115g) unsalted butter, 1/3 cup (66g) brown sugar, and 1/4 cup (50g) granulated sugar until light and fluffy (about 2 minutes). Add 1 teaspoon vanilla and 2 tablespoons (30ml) milk; mix until smooth. Stir in 1 cup (125g) heat-treated flour and 1/4 teaspoon salt. Fold in crushed Oreos (about 10 cookies). The dough should be soft but not sticky.
Prep tip: If too sticky, add another tablespoon flour. -
Shape and freeze the cookie dough:
Roll the dough into 12 small balls (about 1 tablespoon each) and place them on a parchment-lined baking sheet. Freeze for at least 20 minutes until firm.
This step is important—otherwise, the dough might melt too quickly in the oven. -
Preheat your oven:
Set to 350°F (175°C). Line your muffin tin with cupcake liners. -
Make the red velvet cupcake batter:
In a large bowl, whisk together 1 1/4 cups (155g) flour, 1/4 cup (30g) cocoa powder, 3/4 cup (150g) sugar, 1/2 teaspoon baking soda, and 1/2 teaspoon salt. In another bowl, combine 1/2 cup (120ml) oil, 2 eggs, 1/2 cup (120ml) buttermilk, 1 teaspoon vanilla, 1 teaspoon vinegar, and 2 tablespoons (30ml) red food coloring. Pour wet into dry and mix gently until smooth—don’t overmix!
Sensory cue: The batter should be silky and vibrant red. -
Fill the cupcake liners:
Spoon about 1 tablespoon of batter into each liner. Place a frozen Oreo cookie dough ball in the center, then cover with another tablespoon of batter (liners should be about 3/4 full).
Efficiency tip: An ice cream scoop helps keep portions even. -
Bake:
Bake for 18-22 minutes, or until the cupcake tops spring back when touched.
Troubleshooting: If the centers sink, your oven temp may be too low; check with an oven thermometer. -
Cool:
Let cupcakes cool in the tin for 5 minutes, then transfer to a wire rack.
Warning: Don’t frost until completely cool, or the frosting will melt. -
Make the cream cheese frosting:
Beat 8 oz (226g) cream cheese and 1/4 cup (60g) butter until smooth. Add 2 cups (240g) powdered sugar, 1 teaspoon vanilla, and a pinch of salt; beat until fluffy (about 2 minutes).
Prep note: If frosting is too soft, chill for 15 minutes before piping. -
Frost and garnish:
Pipe or spread frosting over cooled cupcakes. Sprinkle with Oreo crumbs, top with mini Oreos, and drizzle with melted chocolate if desired.
Sensory cue: The finished cupcakes should look like little works of art!
My trick: If you want extra gooey centers, don’t freeze the dough as long. But for a firmer, cookie-like middle, stick to the full 20 minutes. These cupcakes are surprisingly forgiving—just don’t overbake, or you’ll miss out on the soft cookie dough bite!
Cooking Tips & Techniques
- Freeze the cookie dough balls: This is the secret to a perfect stuffed center. I once skipped it (was in a rush), and the cookie dough melted into the cupcake—still good, but not the wow factor!
- Don’t overmix the batter: Red velvet needs a gentle touch; overmixing can make the cake dense.
- Use room temperature ingredients: Eggs, buttermilk, and butter blend smoother, leading to a more consistent texture.
- Check your oven temperature: An oven thermometer helps—sometimes the dial lies and cupcakes don’t rise properly.
- Multitasking tip: While the dough balls freeze, prep your cupcake batter and get the frosting started. It saves time, especially if you’re juggling kids or pets!
- Frosting technique: Use a piping bag for bakery-style swirls, but if you’re feeling rustic, a butter knife works for thick, swoopy tops.
- Avoiding common mistakes: Overfilling the liners can cause overflow. Stick to about 3/4 full. Also, if your cupcakes stick to the liners, let them cool completely—patience pays off.
- Personal lesson: Once, I tried using full-size Oreos in the center. It sounded epic but made the cupcakes hard to bite. Crushed, in dough form, is much better!
Consistency with measuring is key—always level your flour, and don’t eyeball the baking soda. The balance of tang and cocoa is what makes red velvet special, and it shines through when you follow the recipe closely. Trust your senses: cupcakes should smell sweet and chocolatey, and tops should be springy. If you ever find the frosting is too runny, add more powdered sugar or chill it, and you’ll get perfect swirls every time.
Variations & Adaptations
- Gluten-Free Version: Use a 1:1 gluten-free flour blend for both cupcakes and cookie dough. I’ve tried this with Bob’s Red Mill—works great!
- Vegan Adaptation: Swap eggs with flax eggs (2 tablespoons flaxseed meal + 5 tablespoons water), use vegan butter and cream cheese, and plant-based milk. The texture is a bit different, but the flavor is still awesome.
- Seasonal Twist: Add crushed peppermint candies to the cookie dough for a holiday version, or mix in fresh raspberries for a summer treat.
- Flavor Customization: Try golden Oreos for a vanilla spin, or add white chocolate chips to the dough for a sweeter bite.
- Cooking Method: For mini cupcakes, halve the dough balls and reduce the baking time to 12-14 minutes.
- Allergen Substitutions: Nut-free as is, but always check your Oreo label. Dairy-free swaps work well in both batter and frosting.
One of my favorite personal twists was swirling a bit of raspberry jam into the cream cheese frosting—sweet, tart, and totally unexpected. These cupcakes are super flexible, so don’t be afraid to play with flavors and fillings. If you’re feeling extra, add a splash of espresso to the batter for a mocha vibe!
Serving & Storage Suggestions
Serve these Oreo Cookie Dough Stuffed Red Velvet Cupcakes at room temperature for the best flavor and texture. The cookie dough center is softest when not chilled, and the frosting stays creamy. Arrange cupcakes on a pretty platter for parties, or in cupcake boxes for gifts—these are total Pinterest gold with their bright red hue and Oreo toppings!
Pair with a glass of cold milk, hot coffee, or even a scoop of vanilla ice cream for extra decadence. If you want a dessert spread, serve alongside chocolate-dipped strawberries or a bowl of fresh berries for contrast.
- Storage: Keep cupcakes in an airtight container in the fridge for up to 4 days. The cookie dough stays gooey, and the red velvet flavor actually intensifies.
- Freezer: You can freeze unfrosted cupcakes for up to 2 months; thaw overnight and frost before serving.
- Reheating: If you want that fresh-from-the-oven taste, microwave a cupcake for 8-10 seconds—just enough to make the center soft again.
- Flavor development: The chocolate and tangy notes deepen after a day, so leftovers are just as delicious (if not better!).
These cupcakes are great for meal prepping desserts or making ahead for parties. The frosting holds up well in the fridge, so you can decorate the day before without any stress.
Nutritional Information & Benefits
| Item | Per Cupcake (approx.) |
|---|---|
| Calories | 340 |
| Protein | 4g |
| Fat | 18g |
| Carbohydrates | 40g |
| Sugar | 28g |
Key ingredients like cocoa powder and buttermilk offer antioxidants and calcium. Oreo Cookie Dough Stuffed Red Velvet Cupcakes are nut-free and can be made gluten-free or dairy-free with simple swaps. They do contain wheat, eggs, and dairy (unless adapted). While these aren’t a health food, they’re a fun way to treat yourself or loved ones. I believe dessert should bring joy, and these cupcakes definitely do!
Conclusion
If you’re searching for a dessert that’s playful, decadent, and downright addictive, these Oreo Cookie Dough Stuffed Red Velvet Cupcakes are it. They’re easy enough for beginners, impressive enough for parties, and totally customizable. I love making these because they turn ordinary ingredients into something special, and each cupcake hides a sweet surprise. Honestly, watching someone bite in and discover the cookie dough center is half the fun!
Try this recipe, experiment with your favorite mix-ins, and let your creative side shine. Whether you stick to the classic or go wild with variations, make sure to let me know how it turns out. Drop a comment with your twist, pin this recipe for later, and share with friends who love a baking challenge. Happy baking—may your cupcakes always be stuffed, beautiful, and 100% delicious!
Frequently Asked Questions
Can I make these cupcakes ahead of time?
Yes! Bake and frost the cupcakes up to a day in advance. Store them in the fridge, and they’ll stay moist and flavorful.
Do I need to heat-treat the flour for the cookie dough?
It’s recommended for safety. Just spread the flour on a baking sheet and bake at 350°F (175°C) for 5 minutes, then cool before using.
Can I use boxed red velvet cake mix?
Sure! If you’re short on time, a boxed mix works. Just follow the instructions, and stuff with the homemade Oreo cookie dough balls.
How do I get bright red cupcakes?
Gel food coloring gives the most vibrant color. Liquid works, but you might need a bit more to get that bold look.
Can I freeze these cupcakes?
Yes! Freeze unfrosted cupcakes for up to 2 months. Thaw overnight, then frost and serve.
Pin This Recipe!

Oreo Cookie Dough Stuffed Red Velvet Cupcakes
- Total Time: 45 minutes
- Yield: 12 cupcakes 1x
Description
These decadent red velvet cupcakes are stuffed with gooey Oreo cookie dough centers and topped with creamy cream cheese frosting. Perfect for celebrations or a sweet treat, they combine classic flavors with a playful twist for a showstopping dessert.
Ingredients
- 1 1/4 cups all-purpose flour
- 1/4 cup unsweetened cocoa powder (Dutch-process preferred)
- 3/4 cup granulated sugar
- 1/2 teaspoon baking soda
- 1/2 teaspoon salt
- 1/2 cup vegetable oil
- 2 large eggs, room temperature
- 1/2 cup buttermilk, room temperature
- 1 teaspoon vanilla extract
- 1 teaspoon white vinegar
- 2 tablespoons red food coloring (gel or liquid)
- 1/2 cup unsalted butter, softened
- 1/3 cup packed brown sugar
- 1/4 cup granulated sugar
- 1 teaspoon vanilla extract
- 2 tablespoons milk (dairy or non-dairy)
- 1 cup all-purpose flour (heat-treated for safety)
- 10 Oreo cookies, crushed (about 1 cup)
- 1/4 teaspoon salt
- 8 oz cream cheese, softened
- 1/4 cup unsalted butter, softened
- 2 cups powdered sugar, sifted
- 1 teaspoon vanilla extract
- Pinch of salt
- Extra Oreo crumbs (optional, for sprinkling)
- Mini Oreos (optional, for topping)
- Chocolate drizzle (optional, melted chocolate chips)
Instructions
- Make the Oreo cookie dough filling: In a medium bowl, cream together unsalted butter, brown sugar, and granulated sugar until light and fluffy (about 2 minutes). Add vanilla and milk; mix until smooth. Stir in heat-treated flour and salt. Fold in crushed Oreos. If too sticky, add another tablespoon flour.
- Shape and freeze the cookie dough: Roll the dough into 12 small balls (about 1 tablespoon each) and place on a parchment-lined baking sheet. Freeze for at least 20 minutes until firm.
- Preheat oven to 350°F (175°C). Line muffin tin with cupcake liners.
- Make the red velvet cupcake batter: In a large bowl, whisk together flour, cocoa powder, sugar, baking soda, and salt. In another bowl, combine oil, eggs, buttermilk, vanilla, vinegar, and red food coloring. Pour wet into dry and mix gently until smooth—do not overmix.
- Fill the cupcake liners: Spoon about 1 tablespoon of batter into each liner. Place a frozen Oreo cookie dough ball in the center, then cover with another tablespoon of batter (liners should be about 3/4 full).
- Bake for 18-22 minutes, or until cupcake tops spring back when touched.
- Cool cupcakes in the tin for 5 minutes, then transfer to a wire rack. Do not frost until completely cool.
- Make the cream cheese frosting: Beat cream cheese and butter until smooth. Add powdered sugar, vanilla, and a pinch of salt; beat until fluffy (about 2 minutes). If frosting is too soft, chill for 15 minutes before piping.
- Frost and garnish: Pipe or spread frosting over cooled cupcakes. Sprinkle with Oreo crumbs, top with mini Oreos, and drizzle with melted chocolate if desired.
Notes
Freeze cookie dough balls for a gooey center. Use room temperature ingredients for best texture. For gluten-free, use a 1:1 blend. Dairy-free and vegan adaptations work well. Do not overmix batter. Let cupcakes cool completely before frosting. Store in airtight container in fridge up to 4 days; freeze unfrosted cupcakes up to 2 months.
- Prep Time: 25 minutes
- Cook Time: 20 minutes
- Category: Dessert
- Cuisine: American
Nutrition
- Serving Size: 1 cupcake
- Calories: 340
- Sugar: 28
- Sodium: 220
- Fat: 18
- Saturated Fat: 10
- Carbohydrates: 40
- Fiber: 1
- Protein: 4
Keywords: red velvet, Oreo, cookie dough, stuffed cupcakes, cream cheese frosting, easy dessert, party treat, homemade cupcakes, baking, chocolate