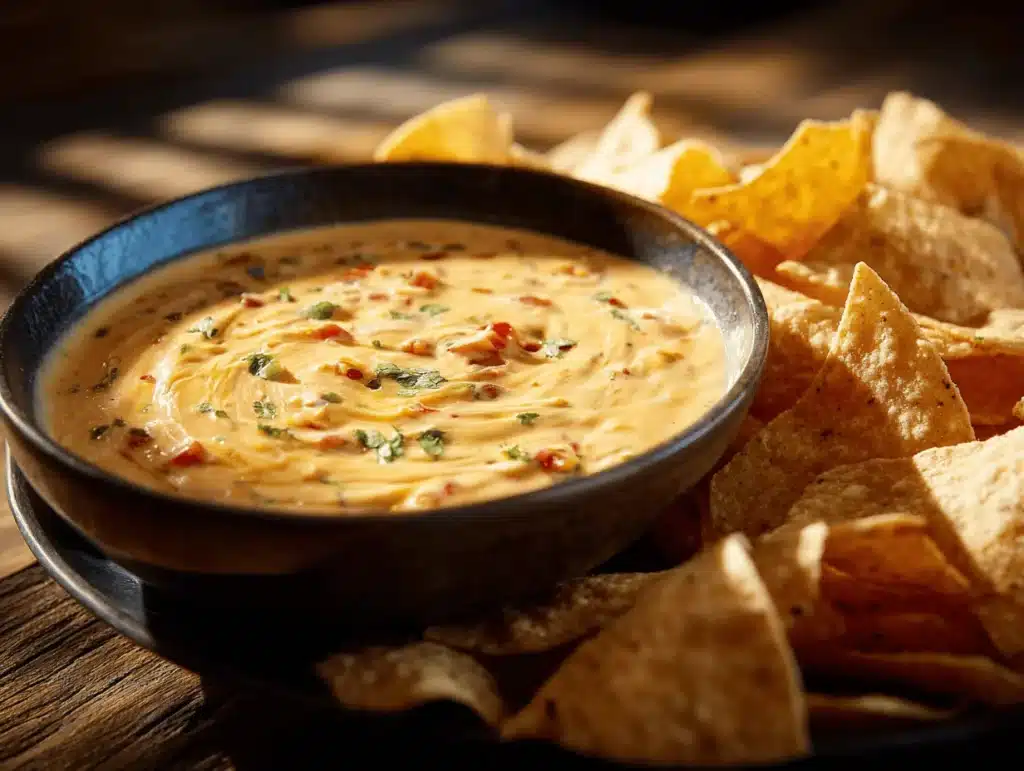
The moment you walk into a Mexican restaurant, you know what’s coming—the warm, savory scent of queso dip floating through the air, calling your name from across the room. I can honestly say, the first time I tried real thick and creamy queso dip at a little family-run spot in San Antonio, it ruined every store-bought jar for me. There’s just something magical about that glossy, rich bowl of melted cheese, speckled with chilies and served piping hot with impossibly crisp tortilla chips. I used to think this restaurant-style queso was a closely guarded secret, but after a dozen batches in my own kitchen, I finally cracked the code!
This irresistible queso dip recipe is the kind that makes you want to linger over every bite. I’m talking about that thick, velvety texture—not runny, not clumpy, but perfectly scoopable every time. It’s the dip that can turn any weeknight into a party, or make game day feel like a celebration. Whether you’re hosting a crowd or just spoiling yourself, this homemade Mexican queso dip is about to become your new obsession.
As a self-proclaimed cheese fanatic (no shame!), I’ve tested every cheese combo, spice blend, and melting technique to capture that authentic taste. Trust me, you don’t need fancy ingredients or a culinary degree—just a few pantry staples and some simple tricks I’ve learned along the way. If you love a good cheesy moment (and who doesn’t?), this thick and creamy queso dip is the recipe you’ll keep coming back to. Let’s get started!
Why You’ll Love This Thick & Creamy Queso Dip
- Restaurant-Quality Texture: This queso dip is thick enough to hug every chip but creamy enough to pour over nachos or tacos—no weird separation or graininess here.
- Quick & Easy: Ready in under 20 minutes (seriously), so you can satisfy those cravings fast without spending hours melting cheese by the stove.
- Simple Ingredients: You probably have everything you need right now—no hunting for rare cheeses or specialty peppers.
- Customizable Heat: You’re in charge of the spice level. Mild, medium, or hot—make it your way.
- Crowd-Pleaser: I’ve brought this dip to potlucks, birthday parties, and family dinners. People ask for the recipe every single time (even my picky nephew who “doesn’t like cheese” couldn’t stop eating it!).
- Perfect for Any Occasion: Whether it’s movie night, game day, or a casual dinner, this queso dip fits right in. Feels like a treat, tastes like comfort.
- Unbelievably Delicious: The cheese flavor is bold but balanced by the gentle kick of green chilies and a hint of spice. It’s the kind of dip that makes you pause after the first bite—yep, it’s that good.
What sets this recipe apart from others? I blend the cheeses with evaporated milk for unbeatable richness and stability, plus a touch of cornstarch for that restaurant-style thickness. Forget watery dips or grainy sauces—this is the smooth, luscious queso you’ve been dreaming about. I’ve tested it with every cheese combo imaginable (trust me, not all work the same!), and this method always delivers. The best part? You can tweak the flavor and heat any way you want. It’s comfort food with a little kick, and you’ll want to keep the recipe handy for every gathering.
Ingredients Needed for Authentic Mexican Restaurant Queso Dip
This thick and creamy queso dip uses simple, wholesome ingredients for unbeatable flavor and texture. You’ll find most of these right in your kitchen (or at any grocery store), and I’ve included notes and swaps to make things easy.
- Cheeses:
- 8 oz (225g) White American cheese, sliced or shredded (key for smooth melting—ask at the deli counter!)
- 4 oz (115g) Monterey Jack cheese, shredded (adds flavor & creaminess)
- Optional: 2 oz (55g) Sharp cheddar cheese, shredded (for a bolder taste)
- Liquid Base:
- 1 cup (240ml) Evaporated milk (keeps dip rich and thick—don’t substitute with regular milk unless you have to)
- 2 tbsp (30ml) Water or milk as needed (to adjust consistency)
- Thickener:
- 1 tbsp (8g) Cornstarch (mix with cold milk for a slurry; prevents separation and keeps dip thick)
- Flavor Boosters:
- 1 (4oz/113g) can diced green chilies, drained (adds mild heat and classic flavor)
- 2 tbsp (20g) finely chopped pickled jalapeños (for heat; adjust based on preference)
- 1/2 tsp garlic powder
- 1/4 tsp onion powder
- 1/4 tsp ground cumin (optional for a warm, earthy note)
- Pinch of smoked paprika (gives a subtle smoky finish)
- Salt & pepper to taste (start with 1/4 tsp each)
- Garnishes (Optional but Recommended!):
- Chopped fresh cilantro
- Diced tomatoes
- Extra jalapeño slices
Ingredient Tips: I recommend Land O’Lakes or Boar’s Head American cheese for the smoothest melt. If you’re shopping for Monterey Jack, avoid pre-shredded bags—they’re coated with anti-caking agents and don’t melt as well. For a gluten-free version, ensure your cornstarch is certified gluten-free. Want a dairy-free option? Substitute with vegan cheese that melts well (like Daiya), but expect a slightly different texture.
Don’t have green chilies? Try roasted poblanos or even a spoonful of salsa verde. You can add more jalapeños for extra kick, or swap in chipotle for smoky heat. Honestly, the base recipe is forgiving—just stick to the American cheese and evaporated milk for that signature restaurant-style queso dip.
Equipment Needed for Perfect Queso Dip
- Medium Saucepan: Stainless steel or nonstick works best. If you’re making a double batch, use a larger pot.
- Whisk: Essential for smooth blending—avoid lumps!
- Spatula: For scraping down the sides and stirring in cheese.
- Cheese Grater: If using block cheese, freshly grated melts way better than pre-shredded.
- Measuring Cups & Spoons: Precision matters for thick, creamy results.
- Small Bowl: For mixing the cornstarch slurry.
- Serving Bowl: I love using a ceramic bowl that retains heat (keeps queso warm longer!).
If you don’t have a whisk, a fork can work in a pinch, but you’ll need to stir more vigorously. I’ve made this queso in a basic aluminum pot and in a fancy enameled Dutch oven—honestly, both work as long as you keep the heat low. For parties, try a small slow cooker to keep the dip warm for hours. Clean-up is easy; just soak pans in warm water if the cheese sticks. For budget-friendly options, check thrift stores for sturdy saucepans and graters that last forever.
Preparation Method: Step-by-Step Thick & Creamy Queso Dip
-
Prep the ingredients: Shred Monterey Jack and cheddar cheese (if using). Slice American cheese into thin strips for easy melting. Drain green chilies and chop jalapeños.
Tip: Freshly grated cheese is key for smooth queso—pre-shredded doesn’t melt as well.
Time: 5 minutes -
Make the slurry: In a small bowl, whisk cornstarch with 2 tbsp cold milk or water until dissolved. This prevents lumps and helps thicken the queso dip.
Warning: Don’t skip this step—adding dry cornstarch directly to hot liquid leads to clumps.
Time: 1 minute -
Heat the liquid base: Pour evaporated milk into the saucepan. Set over medium-low heat. Add garlic powder, onion powder, cumin, paprika, and a pinch of salt. Stir gently until steaming, but not boiling.
Sensory cue: You’ll see tiny bubbles around the edges—don’t let it boil or the cheese may seize up!
Time: 2-3 minutes -
Thicken the base: Stir in the cornstarch slurry. Keep whisking for 2 minutes, until the mixture slightly thickens. You’ll feel the resistance as the sauce changes texture.
Prep note: If it thickens too quickly, add a splash of milk or water to loosen. -
Start adding cheese: Lower heat to low. Gradually add American cheese, stirring constantly until melted and fully blended. Add Monterey Jack (and cheddar, if using) in small batches, whisking after each addition.
Sensory cue: The sauce should look glossy and smooth, not gritty.
Time: 5 minutes -
Stir in chilies & jalapeños: Add green chilies and pickled jalapeños. Continue to stir for 1-2 minutes, letting the flavors meld.
Prep note: Taste and adjust salt, pepper, or heat to your liking. -
Adjust consistency: If queso is too thick, add 1-2 tbsp milk or water, stirring until it reaches your desired scoopable texture. For extra thickness, let it simmer (low heat!) another minute.
Troubleshooting: If cheese separates or sauce looks oily, remove from heat and whisk vigorously. Add more liquid if needed. -
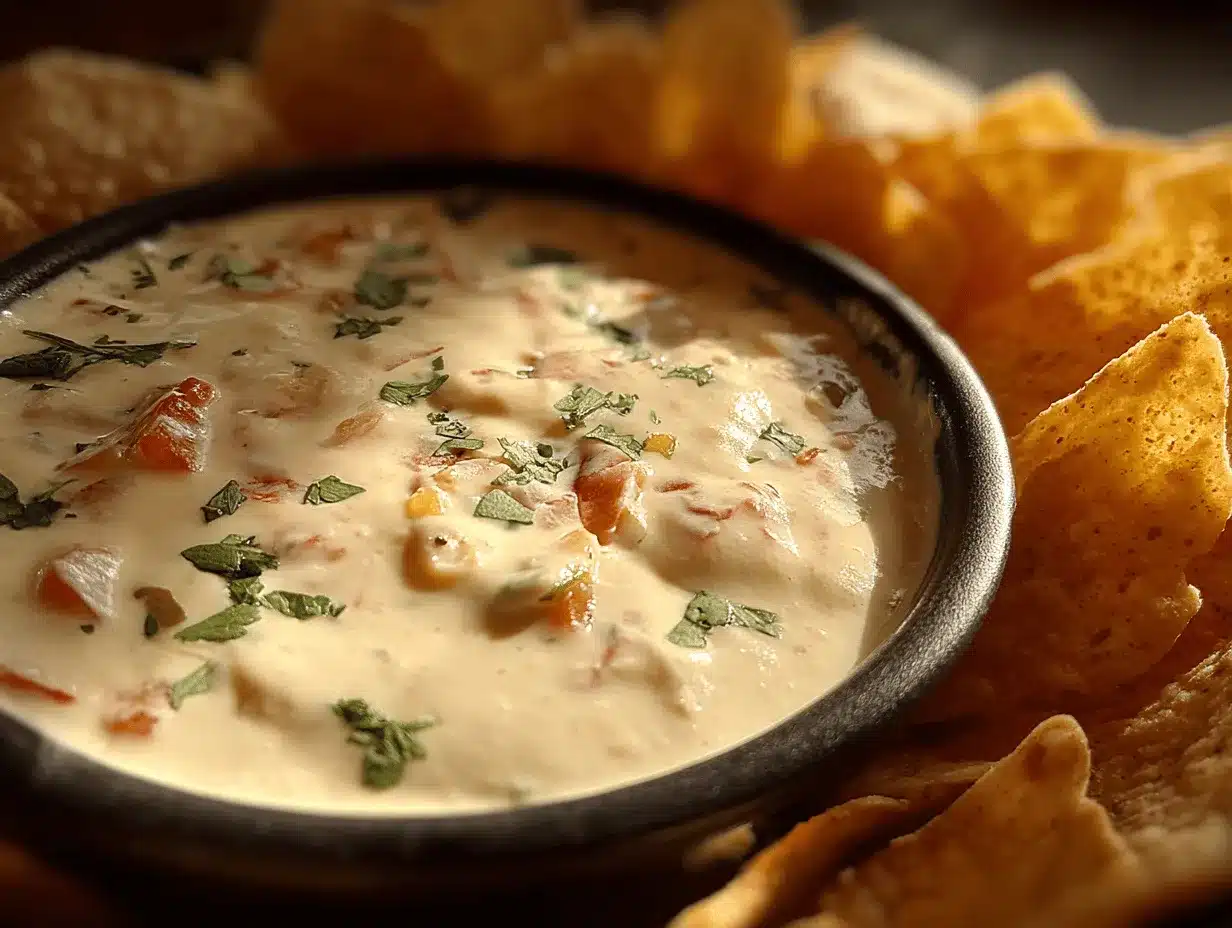
Serve immediately: Transfer queso dip to a warm serving bowl. Top with fresh cilantro, diced tomatoes, and extra jalapeños if desired.
Sensory cue: The dip should be thick, creamy, and fragrant—with a gentle heat from the chilies.
Total time: 15-20 minutes
Personal tip: If you’re making this for a crowd, keep the queso warm in a mini slow cooker or insulated bowl. Leftovers can be gently reheated with a splash of milk—never microwave on high, or the texture may break!
Cooking Tips & Techniques for Foolproof Queso Dip
I’ve had my fair share of cheese disasters—lumpy dips, oily pools, and that dreaded grainy texture. Here’s what I’ve learned (sometimes the hard way):
- Low and Slow Heat: Cheese melts best at low temperatures. Crank up the heat, and you risk breaking the sauce. Patience pays off!
- Use American Cheese: It sounds basic, but it’s the secret to that restaurant-style creaminess. Fancy cheese alone just doesn’t cut it.
- Cornstarch Slurry: Mixing cornstarch with cold liquid before adding keeps things smooth. I skipped this once—never again. The difference is huge.
- Freshly Grated Cheese: Pre-shredded cheese contains anti-caking agents that mess up melting. Grab a grater—takes 2 minutes, totally worth it.
- Don’t Boil: Boiling causes cheese to seize and turn grainy. Keep it just below a simmer (little bubbles, not a rolling boil).
- Stir Constantly: Cheese likes to stick and scorch. Use a spatula to scrape the bottom and sides often.
- Adjust Thickness: Queso thickens as it cools. If yours gets too thick, add a splash of milk, stir, and reheat gently.
- Balance the Spice: Add heat in layers—taste after chilies and jalapeños, then tweak if you want more. Too much at once, and you can’t go back.
I’ve learned that multitasking helps—start prepping garnishes while the cheese melts. If your queso separates (looks oily or clumpy), remove from heat and whisk in a spoonful of cold milk. Works almost every time! Consistency is key, so measure ingredients and don’t rush the melting process. Trust me, you’ll get that perfect creamy dip every time.
Variations & Adaptations: Make Your Queso Dip Unique
One of my favorite things about this queso dip recipe is how customizable it is. Here are some tested variations to suit any taste or dietary need:
- Spicy Chorizo Queso: Brown 1/4 cup (55g) chorizo in your saucepan before starting. Drain excess fat, then proceed with the recipe. Adds smoky depth and a little kick!
- Gluten-Free & Dairy-Free: Use certified gluten-free cornstarch and swap cheeses for vegan melting blends (like Daiya). Substitute evaporated milk with canned coconut milk or oat milk. Texture will be slightly different, but still delicious.
- Green Chile Queso: Double the green chilies and add 1/4 cup roasted poblano peppers. For extra green flavor, stir in 2 tbsp salsa verde at the end.
- Seasonal Twist: In summer, add diced fresh tomatoes and grilled corn to the finished dip for a sweet crunch.
- Roasted Garlic Queso: Swap garlic powder for 2 cloves roasted garlic, mashed—gives a mellow, rich undertone.
For different cooking methods, you can make this queso dip in a slow cooker—just add all ingredients, heat on low, and stir every 20 minutes until fully melted (about 1 hour). If you’re serving a crowd with allergies, try nut-based cheeses and omit jalapeños. My personal favorite? Adding a handful of crispy bacon bits at the end. It’s not traditional, but wow, it’s good!
Serving & Storage Suggestions for Queso Dip
Queso dip is best served hot and fresh—straight from the stovetop or slow cooker. I like to use a warm ceramic bowl, topped with cilantro, diced tomatoes, and a few jalapeño slices for color and zing.
- Dipping: Classic tortilla chips work best, but you can also serve with pretzel bites, fresh veggies, or drizzle over nachos and tacos.
- Pairings: Queso dip absolutely loves cold Mexican beer, margaritas, or even a tangy agua fresca. For a bigger spread, offer guacamole and salsa alongside.
- Storage: Leftover queso can be cooled, covered, and refrigerated for up to 3 days. It thickens in the fridge—reheat gently on the stovetop with a splash of milk, stirring often. Avoid microwaving on high; low power and frequent stirring helps maintain texture.
- Freezing: You can freeze queso in an airtight container for up to 2 months, but thaw and reheat slowly to avoid graininess. Stir in a little milk to recover creaminess.
- Flavor Development: The flavors deepen after a day in the fridge—sometimes it’s even better the next day, especially with extra chilies!
Honestly, though, it rarely lasts long enough to worry about leftovers!
Nutritional Information & Benefits of Thick & Creamy Queso Dip
Here’s a quick breakdown of the nutrition in a typical serving (about 1/4 cup or 60g):
- Calories: ~150
- Protein: 7g (thanks to all that cheese!)
- Fat: 11g
- Carbs: 6g
- Calcium: 20% DV
Cheese is a great source of calcium and protein, which keeps you feeling full and satisfied. Evaporated milk adds richness without extra fat, and green chilies bring vitamin C and antioxidants. For gluten-free diets, just ensure your cornstarch is certified safe. If you’re watching sodium or dairy, use lower-sodium cheese and vegan substitutes. Personally, I love that this dip can fit into a balanced snack—it’s indulgent but not over-the-top, and you can pile it onto veggies for a lighter treat. Just watch out for dairy and pepper allergies!
Conclusion: Why This Queso Dip Recipe Is a Must-Try
If you crave that thick, creamy queso dip from your favorite Mexican restaurant, this recipe delivers every single time. It’s easy, foolproof, and seriously addictive—perfect for parties, family nights, or just treating yourself. You can customize the heat, swap cheeses, and even make it dairy-free if you like. Every batch is packed with flavor and comfort.
I love making this queso dip because it brings people together—everyone crowds around the bowl, chips in hand, sharing laughs and stories. It’s the kind of recipe that always disappears fast, and I hope it becomes a staple in your kitchen too. Don’t be afraid to try your own twists or share your results in the comments—I’d love to hear how you make it your own!
Go ahead, grab your cheese and get melting—your perfect thick and creamy Mexican restaurant style queso dip awaits!
FAQs About Thick & Creamy Mexican Restaurant Queso Dip
Can I make this queso dip ahead of time?
Absolutely! Prepare the dip and refrigerate up to 2 days. Reheat gently with a splash of milk to restore creaminess—just don’t microwave on high.
What cheeses work best for authentic queso dip?
White American cheese is key for smooth texture. Monterey Jack adds creaminess. Cheddar works for extra flavor, but avoid only using cheddar—it can get oily.
How do I fix queso dip that’s too thick or too runny?
If it’s too thick, stir in milk or water a tablespoon at a time until scoopable. If it’s runny, let it simmer on low heat for a minute or add a little more cheese.
Can I freeze leftover queso dip?
Yes! Freeze in an airtight container up to 2 months. Thaw in the fridge and reheat slowly, stirring often. Texture might change a bit, but still tasty.
Is this queso dip gluten-free?
Yes, as long as you use certified gluten-free cornstarch and check your other ingredients for hidden gluten.
Pin This Recipe!


Queso Dip Recipe: Easy Mexican Restaurant Style Thick & Creamy
- Total Time: 15-20 minutes
- Yield: 6 servings 1x
Description
This thick and creamy queso dip delivers authentic Mexican restaurant flavor with a velvety texture, customizable heat, and simple ingredients. Perfect for parties, game day, or a cozy night in, it’s quick to make and always a crowd-pleaser.
Ingredients
- 8 oz white American cheese, sliced or shredded
- 4 oz Monterey Jack cheese, shredded
- Optional: 2 oz sharp cheddar cheese, shredded
- 1 cup evaporated milk
- 2 tbsp water or milk (as needed to adjust consistency)
- 1 tbsp cornstarch
- 1 (4 oz) can diced green chilies, drained
- 2 tbsp finely chopped pickled jalapeños
- 1/2 tsp garlic powder
- 1/4 tsp onion powder
- 1/4 tsp ground cumin (optional)
- Pinch of smoked paprika
- Salt & pepper to taste (start with 1/4 tsp each)
- Optional garnishes: chopped fresh cilantro, diced tomatoes, extra jalapeño slices
Instructions
- Shred Monterey Jack and cheddar cheese (if using). Slice American cheese into thin strips. Drain green chilies and chop jalapeños.
- In a small bowl, whisk cornstarch with 2 tbsp cold milk or water until dissolved.
- Pour evaporated milk into a medium saucepan over medium-low heat. Add garlic powder, onion powder, cumin, paprika, and a pinch of salt. Stir gently until steaming but not boiling.
- Stir in the cornstarch slurry and whisk for 2 minutes until the mixture slightly thickens.
- Lower heat to low. Gradually add American cheese, stirring constantly until melted and blended. Add Monterey Jack (and cheddar, if using) in small batches, whisking after each addition.
- Stir in green chilies and pickled jalapeños. Continue to stir for 1-2 minutes, letting flavors meld. Taste and adjust salt, pepper, or heat as desired.
- If queso is too thick, add 1-2 tbsp milk or water, stirring until desired texture. For extra thickness, let it simmer on low another minute.
- Transfer queso dip to a warm serving bowl. Top with cilantro, diced tomatoes, and extra jalapeños if desired. Serve immediately.
Notes
Use freshly grated cheese for best melting. Keep heat low to avoid grainy texture. Adjust spice level to taste. For parties, keep warm in a slow cooker. Leftovers can be reheated gently with a splash of milk. For dairy-free, use vegan cheese and plant-based milk.
- Prep Time: 7 minutes
- Cook Time: 8-13 minutes
- Category: Appetizer
- Cuisine: Mexican
Nutrition
- Serving Size: About 1/4 cup (60g) per serving
- Calories: 150
- Sugar: 3
- Sodium: 400
- Fat: 11
- Saturated Fat: 7
- Carbohydrates: 6
- Protein: 7
Keywords: queso dip, Mexican cheese dip, restaurant style queso, creamy queso, party dip, game day, appetizer, gluten-free, easy queso, thick queso