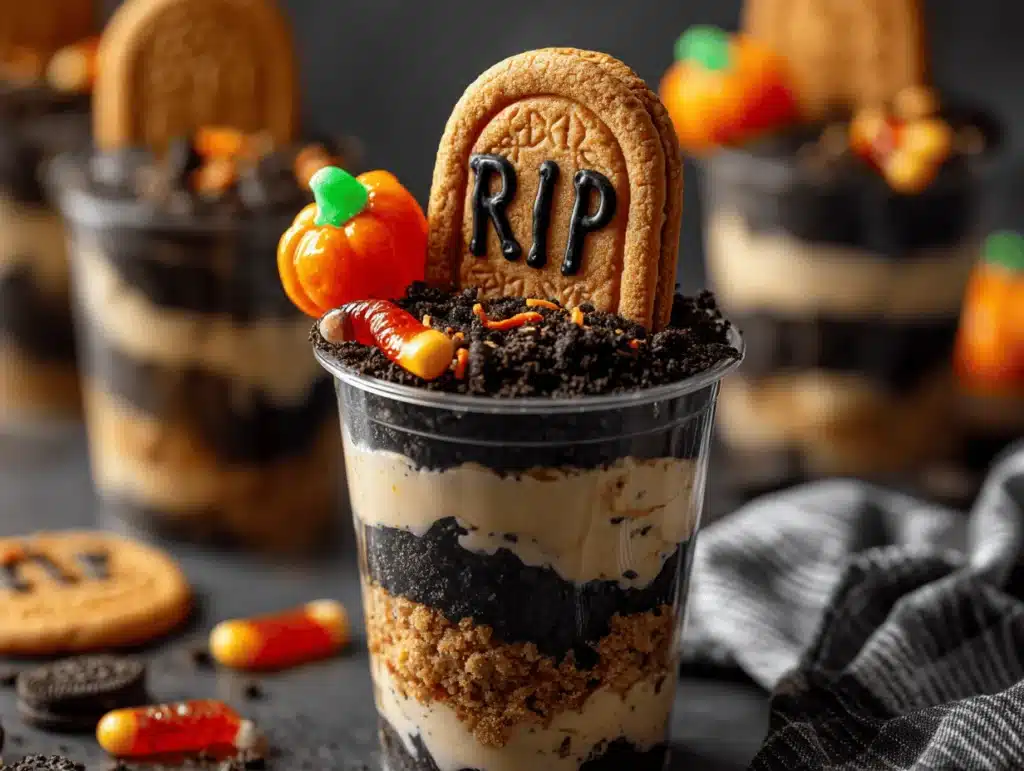
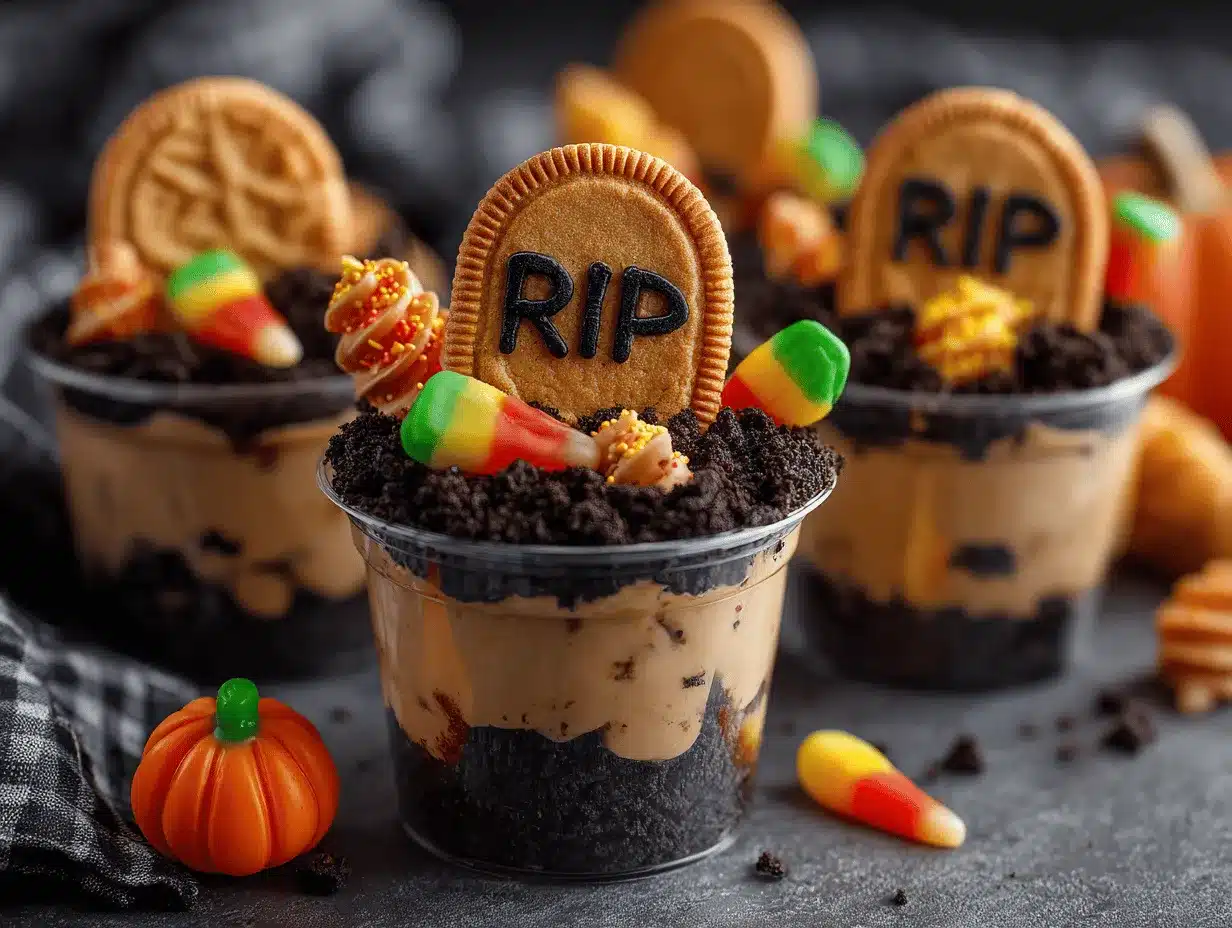
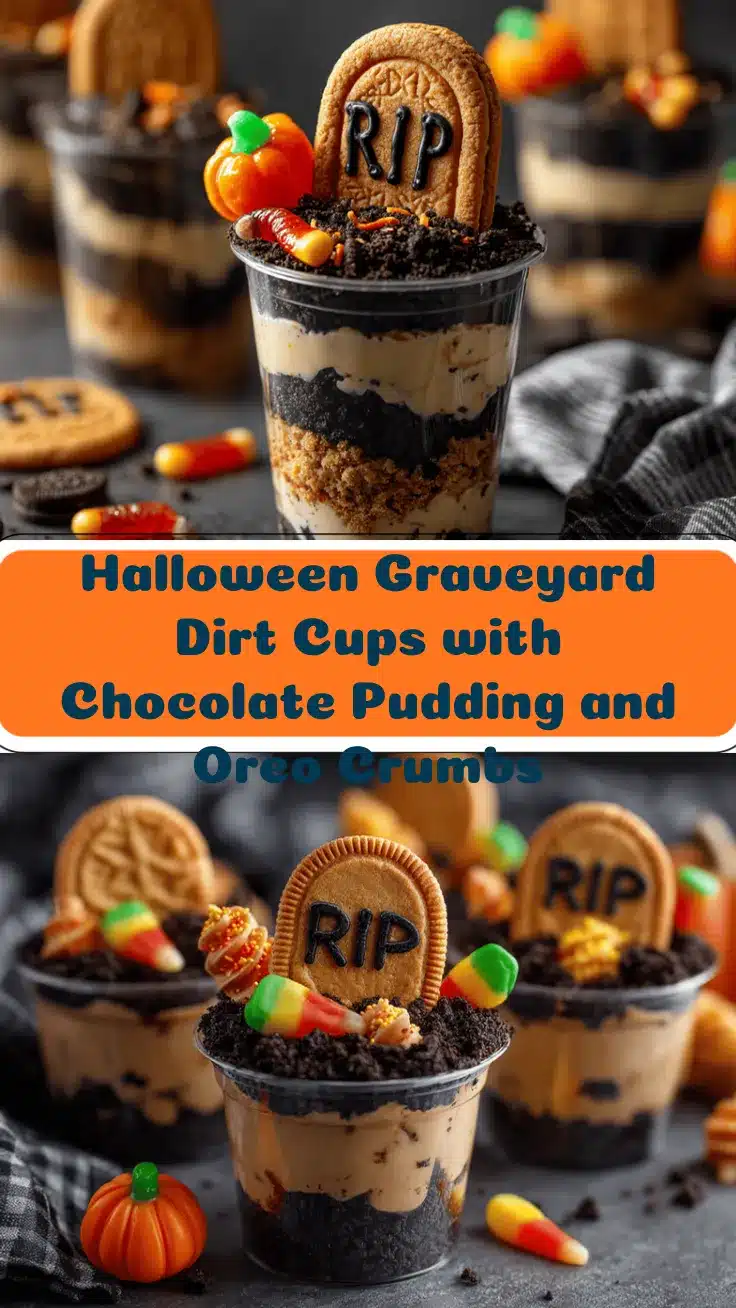
Chocolate crumbs crunching under your spoon, creamy pudding, and ghoulish decorations—Halloween Graveyard Dirt Cups with Oreo crumbs are honestly one of those treats I look forward to every spooky season. The first time I made these, my kitchen looked like a haunted cookie factory, and my kids couldn’t stop giggling at the “worms” wiggling out of their cups. If you love desserts that are fun, fuss-free, and a little bit messy, these dirt cups are about to become your new Halloween tradition. (Trust me, they disappear faster than you can say “trick-or-treat!”)
I discovered this Halloween Graveyard Dirt Cups recipe at a neighborhood potluck, where they were the star of the dessert table. Oreo crumbs layered like fresh-turned earth, chocolate pudding so silky you could eat it with your eyes closed, and the cutest little tombstones made from cookies—what’s not to love? Over the years, I’ve tweaked the recipe for extra chocolatey goodness, and every batch is greeted with squeals and sticky fingers.
What makes these dirt cups a must-have for Halloween? They’re ridiculously easy to make, require no baking (hallelujah!), and give you loads of creative freedom with decorations. Whether you’re wrangling a group of rowdy kids, prepping for a classroom party, or just want a fun dessert after a night of pumpkin carving, Halloween Graveyard Dirt Cups always bring smiles (and satisfy chocolate cravings). Plus, Oreo crumbs make the perfect “dirt”—so realistic, it’s almost scary!
After years of testing, party-hosting, and taste-testing (hey, someone had to do it!), I can promise that these dirt cups deliver every time. Grab your pudding, Oreos, and gummy worms—let’s make some spooky magic!
Why You’ll Love This Recipe
- Quick & Easy: No oven needed—these Halloween Graveyard Dirt Cups come together in about 20 minutes. Perfect for busy parents, last-minute party planners, or anyone who just wants a no-fuss treat.
- Simple Ingredients: You probably already have most of what you need in your kitchen. Oreos, instant pudding, milk, and some Halloween candy for decoration. No fancy shopping lists here.
- Perfect for Parties: These dirt cups are made for Halloween gatherings—kids’ parties, school events, fall festivals, you name it. They’re individual servings, so they’re neat (well, as neat as dirt cups get!) and easy to serve.
- Crowd-Pleaser: Kids go wild for the gummy worms and cookie tombstones, while adults love the nostalgic chocolate flavor. It’s rare to see leftovers.
- Unbelievably Delicious: The layers of Oreo crumbs and chocolate pudding are classic comfort food. Creamy, crunchy, chocolatey—every spoonful is a little celebration.
Here’s what sets my Halloween Graveyard Dirt Cups recipe apart: I use double the Oreo crumbs for extra crunch, and the pudding layer is made with just the right amount of milk for a thick, rich texture. Plus, decorating is totally customizable—make cookie tombstones, add candy pumpkins, or use colorful sprinkles for a graveyard that’s as spooky or silly as you like. I’ve tried dozens of versions, and this one nails the balance between easy and impressive.
Honestly, this isn’t just a dessert—it’s a whole Halloween experience. The best part? Watching kids invent stories about their “graveyards.” It’s dessert and playtime rolled into one. Whether you want to impress guests or just make memories with family, these dirt cups are the treat you’ll come back to every Halloween.
Ingredients Needed
This recipe uses everyday ingredients to create a treat that’s both festive and delicious. You won’t need to hunt down any rare Halloween candy—most items are pantry staples or easy finds at your local grocery store.
- For the Chocolate “Dirt”:
- Oreo cookies (24 cookies, about 250g) – crushed into fine crumbs (double-stuffed Oreos work great, but any variety will do)
- Chocolate pudding mix (2 packages, 3.9 oz/110g each) – instant works best for speed
- Cold milk (4 cups, 960ml) – whole or 2% for richest flavor
- For the “Graveyard” Decorations:
- Gummy worms (1 cup/150g) – for a creepy-crawly touch
- Milano cookies or graham crackers (6-8 pieces) – these become “tombstones”; you can write on them with edible gel
- Candy pumpkins (1/2 cup/75g) – optional, for extra color
- Edible gel pens or black icing (1-2 tubes) – to write “RIP” or spooky messages on tombstones
- Sprinkles (black, orange, or green) – optional for added flair
- For the Creamy Layer:
- Whipped topping (1 tub, 8 oz/225g) – you can use homemade whipped cream or store-bought
- Cream cheese (optional, 4 oz/113g, softened) – for a tangy twist (I do this sometimes for grown-up parties)
Ingredient Tips: For the Oreos, I like to crush them in a zip-top bag with a rolling pin—less mess, and you get perfect crumbs. If you’re gluten-free, swap regular Oreos for a gluten-free version. For dairy-free dirt cups, use almond milk and coconut whipped topping. Candy options are endless; feel free to get creative! I’ve used chocolate rocks and bat-shaped gummies with great success.
Substitutions: You can swap chocolate pudding for vanilla or butterscotch if you want to mix things up. Graham crackers or vanilla wafers work as “dirt” in a pinch (though Oreos are the classic). No whipped topping? Use Greek yogurt for a slightly healthier version (but, let’s face it, Halloween is all about indulgence!). For vegan cups, choose non-dairy pudding mix and plant-based milk.
Honestly, I’ve tried almost every combo—this recipe is super forgiving. As long as you have a crunchy layer, creamy pudding, and fun toppings, your Halloween Graveyard Dirt Cups will be a hit!
Equipment Needed
- Medium mixing bowl: For whisking pudding (I use glass so I can see the texture easily)
- Whisk: To combine pudding mix and milk—an electric mixer works too if you want ultra-smooth pudding
- Zip-top bag or food processor: For crushing Oreo cookies (both ways work; the bag is less cleanup)
- Spatula or large spoon: For layering pudding and whipped topping
- Small serving cups (6-8 oz/180-240ml each): Clear plastic cups show off the layers—glass dessert cups look fancy, but plastic works for parties
- Butter knife: For writing on cookie tombstones using edible gel
- Measuring cups and spoons: For accurate pudding and milk ratios
- Piping bag (optional): Helps with neat whipped topping layers (I usually skip this for casual gatherings)
Budget tip: If you don’t have a food processor, a rolling pin and zip-top bag crush cookies just fine. For serving, recycled yogurt containers or mason jars work in a pinch. Cleanup is easy since there’s no baking—just rinse and go.
My favorite trick: Use mini muffin tins to assemble lots at once, then transfer to cups for serving. Less mess, more speed!
Preparation Method
- Crush the Oreo cookies: Place 24 Oreos (about 250g) into a zip-top bag. Use a rolling pin to crush them into fine crumbs. Alternatively, pulse in a food processor. Set aside. (Tip: Don’t over-process—you want some small chunks for texture!)
- Prepare the chocolate pudding: In a medium bowl, whisk together 2 packages (3.9 oz/110g each) of instant chocolate pudding mix and 4 cups (960ml) cold milk. Whisk for 2 minutes until thickened. Let sit for 5 minutes to set up fully. (If the pudding is too thin, chill for another 5-10 minutes.)
- Blend whipped topping and cream cheese (optional): In a separate bowl, beat 8 oz (225g) whipped topping with 4 oz (113g) softened cream cheese until smooth and fluffy. This adds a tangy layer—skip the cream cheese for a classic version.
- Layer the cups: Spoon 2 tablespoons (about 20g) of Oreo crumbs into the bottom of each serving cup. Add 1/3 cup (80ml) chocolate pudding. Top with 2 tablespoons (20g) whipped topping mixture. Repeat layers if your cups are tall, ending with a generous layer of Oreo “dirt” on top. (Tip: Use a spatula for smooth layers; uneven layers look rustic and fun!)
- Decorate the graveyard: Insert cookie tombstones upright into the “dirt.” Use edible gel pens or black icing to write “RIP” or spooky phrases. Place gummy worms so they peek out of the “soil.” Add candy pumpkins, sprinkles, or chocolate rocks for extra flair. (Kids love to help with this step—just expect a little chaos!)
- Chill before serving: Refrigerate dirt cups for at least 30 minutes to set layers and meld flavors. (If you’re short on time, 10 minutes in the freezer works too.)
- Serve and enjoy: Remove from fridge, add any last-minute decorations, and serve cold.
Time estimates: Crushing cookies: 5 minutes. Mixing pudding: 5 minutes. Layering: 10 minutes. Decorating: 5-10 minutes (depends on how fancy you get!).
If your pudding is runny, add a little less milk next time or chill longer. Too much moisture can make the crumbs soggy—so layer just before serving for best crunch. If you want extra stability, use full-fat milk. For party prep, assemble cups the night before but add decorations the day of.
Honestly, perfection isn’t the goal here—these dirt cups are meant to be playful and a little messy. The more unique, the better!
Cooking Tips & Techniques
After making Halloween Graveyard Dirt Cups dozens of times, I’ve picked up a few tricks (and learned from my share of dessert “graveyard” disasters!). Here’s what works best:
- Pudding consistency is key: If you use too much milk, the pudding will be runny and won’t hold its layers. Stick to the package ratio, and let it set up before layering.
- Crush cookies just before assembling: Pre-crushed Oreos can get soft if left out. For the best crunch, crush them right before you layer.
- Don’t overdo the whipped topping: Too much can make dirt cups overly sweet and mask the chocolate flavor. About 2 tablespoons per layer is perfect.
- Decorations stick best in chilled cups: If you add tombstones and worms to warm pudding, they’ll melt or tip over. Chill cups first, then decorate just before serving.
- Layering helps with texture: I like to do at least two layers of crumbs, pudding, and topping—makes every bite interesting.
- Let kids decorate: It might get messy, but their creativity is half the fun. Just keep extra wipes on hand!
- Multi-tasking tip: Crush all cookies first, mix pudding while cookies are crushing, then set up an assembly line for layering and decorating.
- Common mistakes: Using regular pudding instead of instant takes much longer to set. Skipping chilling leads to soupy cups. Forgetting to taste-test decorations—sometimes gummies don’t blend well with pudding, so try one before adding to all cups.
I’ve had cups collapse under too-heavy tombstones (use thin cookies!) and once used too much whipped topping, making my “graveyard” look like a snowstorm. Live and learn! Stick to the basics, and your dirt cups will look and taste great.
Variations & Adaptations
- Dietary swaps: Use gluten-free Oreos for allergy-friendly dirt cups. Substitute almond or oat milk for dairy-free pudding. Coconut whipped topping is perfect for vegan guests.
- Seasonal flair: Try using pumpkin spice pudding instead of chocolate for a fall twist. Add candy corn or autumn leaf sprinkles for a harvest vibe.
- Flavor boosts: Mix peanut butter into your pudding layer for a Reese’s-inspired version. For adults, add a splash of coffee liqueur to the pudding (not for the kids, obviously!).
- Cooking method: If you want a firmer base, use chocolate cake cubes instead of crumbs. For a frozen treat, freeze assembled cups for 1-2 hours for a “dirt cup ice cream” experience.
- Customization: Make mini cups for snack-size treats, or jumbo ones for sharing. Use colored pudding (green or orange) for a neon spooky look. Swap out gummy worms for spiders or bats if you can find them.
- Personal twist: My favorite is adding a layer of raspberry jam before the top crumbs—looks like “bloody earth” and adds a tart kick. It’s a hit with teens!
Honestly, these dirt cups are made to be messed with. The only rule? Have fun with it! If you have picky eaters or allergies, just swap ingredients—there’s always a way to make them work.
Serving & Storage Suggestions
Serving: Dirt cups are best served chilled. The colors and layers pop in clear cups—great for those Instagram and Pinterest shots! For parties, line them up on a tray and scatter extra gummy worms and pumpkins around for decoration.
If you really want to impress, add a sprinkle of edible glitter for a magical graveyard effect. Pair with apple cider or hot chocolate for the ultimate Halloween spread.
Storage: Store assembled cups in the refrigerator, covered with plastic wrap, for up to 2 days. Decorations (especially cookies) should be added just before serving to keep them crisp. If you want to freeze cups, skip the gummy worms—they don’t freeze well. Frozen dirt cups last up to 1 month; thaw in the fridge before eating.
Reheating: No need to reheat—these are served cold. If you like a slightly softer pudding, let cups sit at room temperature for 10-15 minutes before serving.
Flavor notes: The chocolate and Oreo flavors deepen overnight, so making them a day ahead can actually improve taste (just keep decorations separate until serving time).
Nutritional Information & Benefits
Here’s an estimate per serving (based on a standard cup):
- Calories: ~300
- Fat: 12g
- Carbohydrates: 45g
- Protein: 4g
- Sugar: 32g
Health perks: Halloween Graveyard Dirt Cups aren’t exactly health food, but they’re portion-controlled and easy to adapt for allergies (use gluten-free or dairy-free options). Cocoa in chocolate pudding adds a little antioxidant boost. If you use Greek yogurt instead of whipped topping, you’ll sneak in some extra protein.
Dietary notes: Contains gluten (Oreos), dairy (milk, pudding, whipped topping), and soy (in some candies and cookies). Always check labels if you’re serving guests with allergies.
I like to think of these as a “sometimes treat”—they’re festive, fun, and bring people together. For me, that’s the best kind of wellness!
Conclusion
Halloween Graveyard Dirt Cups with Oreo crumbs are more than just a dessert—they’re a celebration of spooky fun, creativity, and chocolatey goodness. Every year, my family asks for these cups by name, and I love watching kids and grown-ups alike dig into their “graveyards.”
This recipe is easy to customize for taste, allergies, or party size. Whether you go classic with Oreos and pudding or try outrageous flavors and decorations, you can make it your own. Honestly, the memories and laughter are just as sweet as the treat itself.
Ready to whip up your own graveyard dirt cups? I’d love to hear your twists—share your creations in the comments, pin this recipe for later, and tag me on social media with your best spooky decorations. Happy haunting and happy snacking!
FAQs
How far in advance can I make Halloween Graveyard Dirt Cups?
You can make the pudding and cookie layers up to 24 hours ahead. For best texture, add decorations (tombstones, gummy worms) right before serving.
Can I use homemade pudding instead of instant?
Absolutely! Just make sure it’s thick enough to hold the layers. Homemade pudding adds a rich flavor, but you’ll need to chill it longer.
Are these dirt cups safe for kids with allergies?
It depends on your ingredients. Use gluten-free Oreos, plant-based milk, and allergy-friendly candies for safe treats. Always double-check labels.
What can I use if I don’t have clear cups?
Any small serving container works—mason jars, recycled yogurt cups, or even bowls. Clear cups just show off the layers best.
Can I freeze Halloween Graveyard Dirt Cups?
Yes, you can freeze them (without gummy worms or cookies) for up to a month. Thaw in the fridge before serving for best texture.
Pin This Recipe!

Halloween Graveyard Dirt Cups
- Total Time: 20 minutes
- Yield: 6-8 servings 1x
Description
Halloween Graveyard Dirt Cups are a fun, no-bake dessert featuring layers of Oreo cookie crumbs, creamy chocolate pudding, and spooky decorations like gummy worms and cookie tombstones. Perfect for parties, these festive treats are easy to make and always a crowd-pleaser.
Ingredients
- 24 Oreo cookies (about 250g), crushed into fine crumbs
- 2 packages (3.9 oz each) instant chocolate pudding mix
- 4 cups cold milk (whole or 2%)
- 1 cup gummy worms
- 6–8 Milano cookies or graham crackers (for tombstones)
- 1/2 cup candy pumpkins (optional)
- 1–2 tubes edible gel pens or black icing
- Sprinkles (black, orange, or green, optional)
- 1 tub (8 oz) whipped topping
- 4 oz cream cheese, softened (optional)
Instructions
- Place Oreo cookies in a zip-top bag and crush with a rolling pin or pulse in a food processor until fine crumbs form. Set aside.
- In a medium bowl, whisk together instant chocolate pudding mix and cold milk for 2 minutes until thickened. Let sit for 5 minutes to set.
- In a separate bowl, beat whipped topping with softened cream cheese until smooth and fluffy (optional for tangy layer).
- Spoon 2 tablespoons of Oreo crumbs into the bottom of each serving cup. Add 1/3 cup chocolate pudding. Top with 2 tablespoons whipped topping mixture. Repeat layers if cups are tall, ending with Oreo crumbs on top.
- Decorate each cup with cookie tombstones (write ‘RIP’ or spooky messages with edible gel), gummy worms, candy pumpkins, and sprinkles as desired.
- Refrigerate dirt cups for at least 30 minutes to set layers and meld flavors.
- Serve chilled and enjoy!
Notes
Crush cookies just before assembling for best crunch. Chill cups before decorating to keep toppings crisp. For gluten-free or dairy-free options, substitute ingredients as needed. Assemble cups the night before and add decorations just before serving for best texture.
- Prep Time: 15 minutes
- Cook Time: 0 minutes
- Category: Dessert
- Cuisine: American
Nutrition
- Serving Size: 1 dirt cup (about 6-8 oz)
- Calories: 300
- Sugar: 32
- Sodium: 350
- Fat: 12
- Saturated Fat: 6
- Carbohydrates: 45
- Fiber: 2
- Protein: 4
Keywords: Halloween, dirt cups, Oreo, pudding, no-bake, party dessert, graveyard, spooky treats, kids dessert