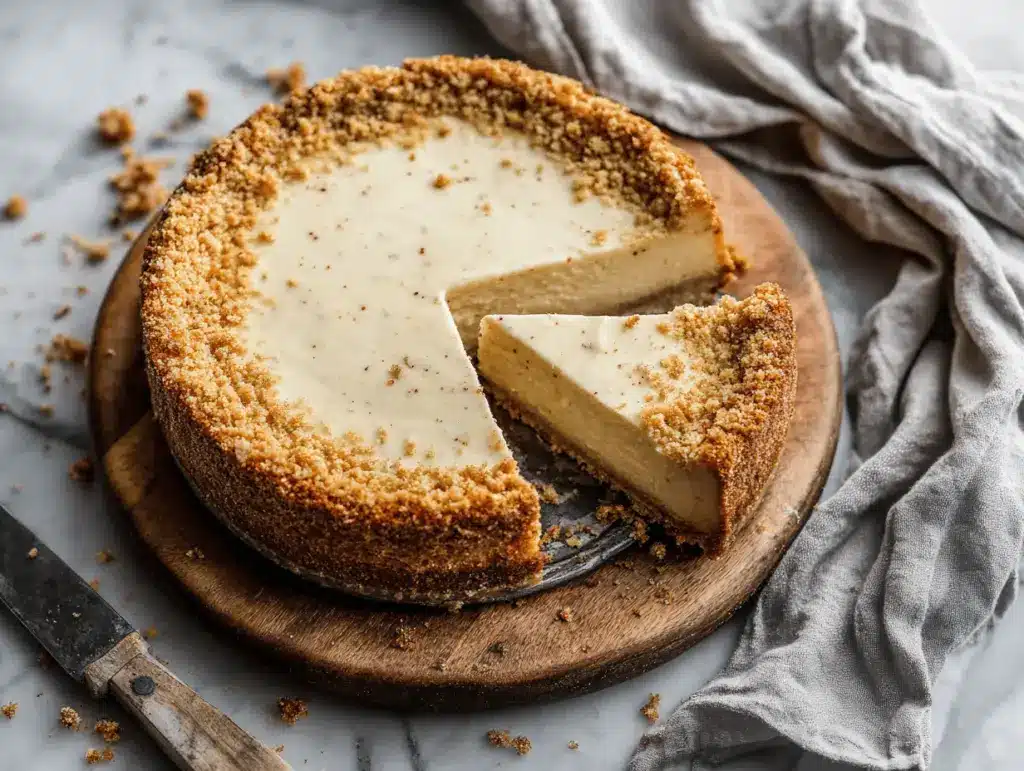
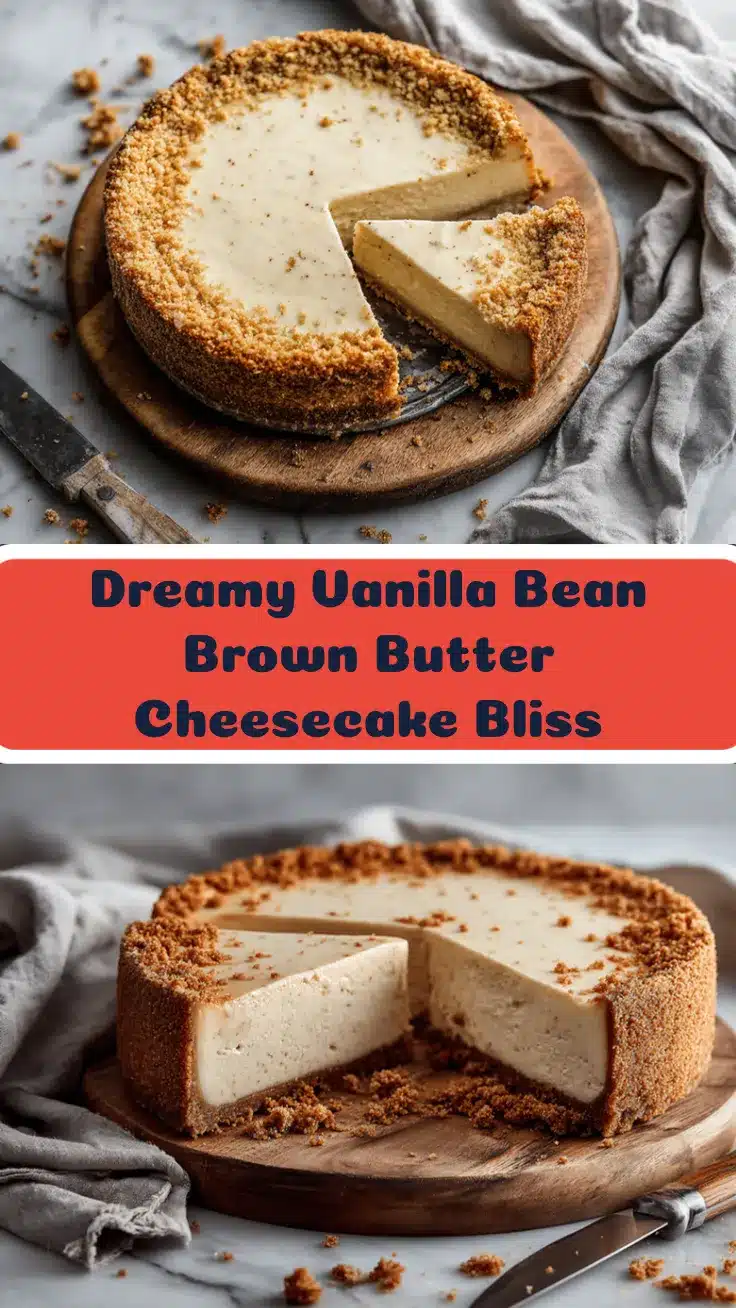
Golden pools of brown butter swirling into silky cream cheese, flecks of real vanilla bean shimmering in every slice—honestly, is there anything more tempting? The first time I tasted this vanilla bean brown butter cheesecake, it was one of those moments where everything else faded away (I’m not exaggerating). The aroma alone was enough to stop me in my tracks: toasted nutty butter, warm vanilla, and that classic cheesecake tang. You know, some desserts are good, but this one? This is next-level.
I stumbled on the idea during a baking marathon—one of those “let’s see what happens if…” experiments that actually worked. I’d run out of my usual flavorings, but found a lonely vanilla bean and some unsalted butter calling my name. After browning the butter (and nearly burning it, oops), I mixed it into the batter and wow, the taste was unreal. It’s now my go-to for birthdays, holidays, and honestly, anytime I want to impress without fuss.
What I love about this vanilla bean brown butter cheesecake is how it combines everyday ingredients into something special. No weird steps, no impossible techniques. Just simple, classic flavors with a twist that makes everyone ask for the recipe. Plus, it’s perfect for anyone: busy families, picky eaters, even those friends who “don’t like cheesecake” (they’ll change their minds, promise). After baking this at least a dozen times, I can tell you: it’s fail-proof, crowd-pleasing, and always looks gorgeous on your Pinterest board or dessert table.
Why You’ll Love This Vanilla Bean Brown Butter Cheesecake
- Quick & Easy: You can prep this cheesecake in under 30 minutes (not counting bake time)—great for weeknights or when you want a fancy treat without hours in the kitchen.
- Simple Ingredients: No need for specialty groceries. Everything is probably in your pantry or fridge already.
- Perfect for Any Occasion: It’s elegant enough for birthdays or celebrations, but simple enough for a cozy family dinner.
- Crowd-Pleaser: Kids, adults, even the “I don’t eat sweets” people—everyone comes back for seconds. I’ve tested this at multiple gatherings, and it always gets rave reviews.
- Unbelievably Delicious: The brown butter adds a rich, nutty layer you just don’t get in regular cheesecake, and real vanilla bean makes every bite luxurious.
What makes this vanilla bean brown butter cheesecake different? For starters, browning the butter isn’t just for show—it’s the secret to a depth of flavor you won’t find in plain cheesecake. The vanilla bean speckles are more than pretty; they bring a perfume that bottled extract can’t match. I blend the cottage cheese and cream cheese until ultra-smooth, so the texture is always creamy, never grainy.
It’s comfort food with a twist. You get the classic taste, but it feels fancy without being fussy. I’ve made versions with gluten-free crusts, swapped sweeteners, and even tested mini cheesecakes—this recipe adapts beautifully. Whether you’re a first-time cheesecake baker or a seasoned pro, you’ll love how reliably silky and rich it turns out.
What Ingredients You Will Need
This recipe uses simple, wholesome ingredients to deliver bold flavor and satisfying texture without the fuss. Most are pantry staples, and substitutions are easy if needed!
- For the crust:
- Graham cracker crumbs – 1 1/2 cups (180g) (classic, but digestive biscuits or gluten-free cookies work too)
- Granulated sugar – 2 tbsp (25g)
- Unsalted butter, melted – 6 tbsp (85g) (adds richness and helps the crust set)
- Pinch of salt (balances sweetness)
- For the cheesecake filling:
- Cream cheese – 24 oz (680g), softened (I prefer full-fat for best texture; Philadelphia is my go-to)
- Brown butter – 1/2 cup (115g), cooled (see tips below for browning butter)
- Granulated sugar – 1 cup (200g) (you can sub coconut sugar or a low-carb alternative if needed)
- Large eggs – 3, room temperature
- Sour cream – 1 cup (240g) (adds tang and creaminess; Greek yogurt works in a pinch)
- Vanilla bean – 1 whole, seeds scraped (or 2 tsp vanilla bean paste; extract works but isn’t as aromatic)
- All-purpose flour – 2 tbsp (16g) (helps set the filling; swap with cornstarch for gluten-free)
- Pinch of salt (trust me, it makes the vanilla pop)
- Optional for topping:
- Fresh berries (strawberries, raspberries, blueberries—adds color and tartness)
- Whipped cream (for extra indulgence)
- Powdered sugar, for dusting
If you want to switch things up, try almond flour crust for a gluten-free version, or swap sour cream for coconut yogurt for dairy-free. For the vanilla, scraping the bean is worth it, but paste or extract is fine if that’s what you’ve got. I’ve used everything from regular butter to European-style—just make sure it’s real, unsalted butter for browning.
Equipment Needed
- 9-inch (23cm) springform pan (essential for easy release; a deep cake pan works, but lining with parchment is a must)
- Electric mixer or stand mixer (hand whisk works, but takes longer—trust me, I’ve tried both)
- Medium saucepan (for browning butter; a light-colored pan helps you see the color change)
- Mixing bowls (2-3, various sizes)
- Rubber spatula (for scraping the bowl and smoothing the batter)
- Measuring cups and spoons (accuracy counts here!)
- Fine mesh sieve (optional; helpful for sifting flour or smoothing the batter)
- Oven mitts (don’t be like me—once burned, forever cautious)
For budget-friendly options, I’ve used a regular cake pan lined with parchment and a hand whisk when my mixer was on the fritz. Maintenance tip: clean your springform pan well after every use to prevent sticking and leaks (I learned the hard way). If you don’t have a mesh sieve, tapping the bowl gently can help release bubbles for a smoother top.
Preparation Method

-
Make the crust:
- Preheat your oven to 325°F (160°C). Grease a 9-inch (23cm) springform pan and line the base with parchment.
- Mix 1 1/2 cups (180g) graham cracker crumbs, 2 tbsp (25g) sugar, pinch of salt, and 6 tbsp (85g) melted unsalted butter in a bowl until evenly moist.
- Press firmly into the pan base (I use a flat-bottomed glass for evenness). Bake for 10 minutes, then let cool.
-
Brown the butter:
- Add 1/2 cup (115g) unsalted butter to a medium saucepan over medium heat.
- Stir occasionally as it melts, then foams. Watch for golden-brown bits at the bottom and a nutty aroma (takes 5-7 minutes).
- Remove from heat immediately—if it turns black, it’s burnt! Pour into a bowl and let cool to room temp.
-
Prepare the cheesecake filling:
- Beat 24 oz (680g) softened cream cheese until smooth, about 1-2 minutes. Add 1 cup (200g) sugar and continue beating until fluffy.
- Add 1 cup (240g) sour cream, cooled brown butter, and vanilla bean seeds (or paste/extract). Mix on low until just combined.
- Add 3 eggs one at a time, mixing gently after each (don’t overmix or the batter gets too airy and cracks).
- Fold in 2 tbsp (16g) flour and a pinch of salt. Scrape bowl to combine (batter should be creamy, not runny).
-
Assemble and bake:
- Pour filling over cooled crust. Smooth top with spatula.
- Wrap pan base in foil (to prevent leaks if using a water bath—optional, but helps prevent cracks).
- Bake at 325°F (160°C) for 55-65 minutes. The edges should look set, center slightly wobbly.
- Turn off oven, crack door, and let cheesecake cool inside for 1 hour (helps prevent sudden temp changes and cracking).
-
Chill:
- Cool to room temp, then refrigerate at least 4 hours (overnight is best).
- Run a knife around the edge before releasing the springform.
- Top with berries, whipped cream, or powdered sugar before serving.
Preparation notes: If the top cracks, don’t panic—cover with berries or whipped cream. If your batter seems too thick, add a splash of milk. For extra-smooth cheesecake, use room temperature ingredients and mix gently. Sensory cues: batter should smell rich and nutty, with visible vanilla flecks. The finished cheesecake should jiggle slightly in the middle when gently shaken. I always check at 50 minutes—my oven runs hot!
Cooking Tips & Techniques
Browning butter is both art and science. I’ve burned it more than once, so here’s my tip: use a light-colored pan and take it off the heat as soon as the bits turn golden and it smells nutty. Don’t wander off—this step goes from perfect to burnt in seconds.
For the creamiest texture, always use room temperature cream cheese and eggs. If you try to rush it, the filling gets lumpy (I learned this the hard way during a holiday rush). Overmixing is another common mistake—if you beat too much air in, the cheesecake can puff up and crack. Mix slowly and scrape the bowl often.
Baking in a water bath helps prevent cracks and keeps the texture silky. If you skip it, just make sure not to overbake. It’s okay if the center wobbles—carryover heat will finish it.
Multitasking tip: Brown the butter while the crust is baking, then cool it quickly by pouring into a wide bowl. If you want a super-smooth top, tap the pan gently on the counter before baking to release air bubbles. For consistency, always measure ingredients with a scale—cheesecake is one of those recipes where precision matters.
Variations & Adaptations
- Gluten-free version: Use almond flour or gluten-free cookies for the crust and swap flour for cornstarch in the filling. I’ve made this for gluten-sensitive friends and it works great!
- Seasonal twist: Add orange or lemon zest to the filling for a citrusy note, or swirl in a berry compote before baking for bursts of color and flavor.
- Low-carb adaptation: Swap regular sugar for a granulated sweetener and use a nut-based crust. The flavor stays rich, with fewer carbs.
- Dairy-free option: Use vegan cream cheese, coconut yogurt, and plant-based butter. It’s not exactly the same, but for those with allergies, it’s pretty close!
Personal variation I love: I sometimes add a touch of almond extract or a layer of caramel sauce on top. It’s wild how much a little change can shift the whole vibe. Don’t be afraid to experiment—this recipe is forgiving!
Serving & Storage Suggestions
This vanilla bean brown butter cheesecake is best served chilled, straight from the fridge. Slice with a sharp, wet knife for clean edges (pro tip—wipe between cuts). Arrange slices on a pretty plate and top with fresh berries or a dollop of whipped cream for that Instagram-worthy look.
Pair with coffee, tea, or even a sparkling dessert wine. For a brunch spread, serve alongside fresh fruit or a berry salad.
Storage is simple: Cover leftovers tightly and refrigerate for up to 5 days. For longer storage, freeze individual slices wrapped in plastic and foil for up to two months. Thaw overnight in the fridge, then bring to room temp before serving. The flavors deepen over time—day two is even better!
To reheat (if you really want warm cheesecake), microwave a slice for 10-15 seconds, but honestly, cold is best. If you notice condensation, blot gently with a paper towel before serving.
Nutritional Information & Benefits
One slice (1/12th of the cheesecake) has approximately:
- Calories: 410
- Fat: 28g
- Carbohydrates: 32g
- Protein: 6g
Key benefits: Cream cheese and sour cream add calcium and protein, while real vanilla bean brings antioxidants. Using brown butter gives a richer flavor without needing extra sugar. If you go gluten-free or use a low-carb crust, it’s friendly for those diets. Watch out for dairy and gluten if you have allergies—easy swaps are listed above.
From my wellness perspective, this cheesecake is a treat—rich, satisfying, and a little goes a long way. I love that you can adjust the recipe for health needs without losing the magic.
Conclusion
So, why should you try this vanilla bean brown butter cheesecake? It’s simple, reliable, and totally delicious. Whether you’re baking for loved ones or just treating yourself, this recipe delivers that “wow” factor—every time.
Don’t be afraid to make it your own. Switch up the crust, change the toppings, or add a flavor twist. That’s the fun of homemade desserts! Personally, I love sharing this cheesecake at gatherings; it’s always the first to disappear.
If you give this recipe a go, let me know in the comments! Share your photos, tweaks, or any epic baking stories. Your feedback helps me make these recipes even better. Happy baking, and remember—sometimes the best desserts are the ones you made yourself (with a little brown butter magic).
FAQs
Can I make vanilla bean brown butter cheesecake ahead of time?
Absolutely! It’s actually better made a day ahead so the flavors meld. Chill overnight and serve the next day.
What if I don’t have a vanilla bean?
No problem. Use 2 teaspoons of vanilla bean paste or pure vanilla extract. The flavor will still be delicious, just a bit less intense.
How do I prevent cracks on top?
Mix gently, use room temperature ingredients, and cool slowly in the oven. Covering with berries or whipped cream also hides any cracks!
Can I freeze cheesecake?
Yes! Slice and wrap tightly in plastic and foil. Freeze for up to 2 months, thaw overnight in the fridge before serving.
Is it possible to make this gluten-free?
Definitely. Use gluten-free cookies or almond flour for the crust and swap out the flour for cornstarch in the filling. Works perfectly!
Pin This Recipe!
Vanilla Bean Brown Butter Cheesecake
- Total Time: 5 hours 35 minutes
- Yield: 12 servings 1x
Description
This silky homemade cheesecake features golden brown butter swirled into creamy filling, flecks of real vanilla bean, and a classic graham cracker crust. It’s a crowd-pleasing, elegant dessert that’s easy to make and perfect for any occasion.
Ingredients
- 1 1/2 cups graham cracker crumbs (or digestive biscuits or gluten-free cookies)
- 2 tablespoons granulated sugar
- 6 tablespoons unsalted butter, melted
- Pinch of salt
- 24 ounces cream cheese, softened
- 1/2 cup unsalted butter (for browning), cooled
- 1 cup granulated sugar
- 3 large eggs, room temperature
- 1 cup sour cream (or Greek yogurt)
- 1 vanilla bean, seeds scraped (or 2 teaspoons vanilla bean paste or extract)
- 2 tablespoons all-purpose flour (or cornstarch for gluten-free)
- Pinch of salt
- Fresh berries (optional, for topping)
- Whipped cream (optional, for topping)
- Powdered sugar (optional, for dusting)
Instructions
- Preheat oven to 325°F (160°C). Grease a 9-inch springform pan and line the base with parchment.
- Mix graham cracker crumbs, sugar, pinch of salt, and melted butter in a bowl until evenly moist.
- Press mixture firmly into the pan base. Bake for 10 minutes, then let cool.
- Add 1/2 cup unsalted butter to a medium saucepan over medium heat. Stir occasionally as it melts and foams. Watch for golden-brown bits and a nutty aroma (5-7 minutes). Remove from heat immediately and let cool to room temperature.
- Beat softened cream cheese until smooth (1-2 minutes). Add sugar and continue beating until fluffy.
- Add sour cream, cooled brown butter, and vanilla bean seeds (or paste/extract). Mix on low until just combined.
- Add eggs one at a time, mixing gently after each. Do not overmix.
- Fold in flour and a pinch of salt. Scrape bowl to combine.
- Pour filling over cooled crust. Smooth top with spatula.
- Wrap pan base in foil (optional, for water bath). Bake at 325°F for 55-65 minutes, until edges are set and center is slightly wobbly.
- Turn off oven, crack door, and let cheesecake cool inside for 1 hour.
- Cool to room temperature, then refrigerate at least 4 hours (overnight is best).
- Run a knife around the edge before releasing the springform.
- Top with berries, whipped cream, or powdered sugar before serving.
Notes
For best results, use room temperature ingredients and mix gently to avoid cracks. Browning butter adds depth—watch closely to avoid burning. A water bath helps prevent cracks but is optional. For gluten-free, use almond flour or gluten-free cookies for the crust and cornstarch in the filling. Cheesecake is best chilled overnight and can be frozen for up to 2 months.
- Prep Time: 30 minutes
- Cook Time: 65 minutes
- Category: Dessert
- Cuisine: American
Nutrition
- Serving Size: 1 slice (1/12th of cheesecake)
- Calories: 410
- Sugar: 24
- Sodium: 260
- Fat: 28
- Saturated Fat: 17
- Carbohydrates: 32
- Fiber: 1
- Protein: 6
Keywords: cheesecake, vanilla bean, brown butter, dessert, homemade, easy, crowd-pleaser, holiday, birthday, creamy, classic