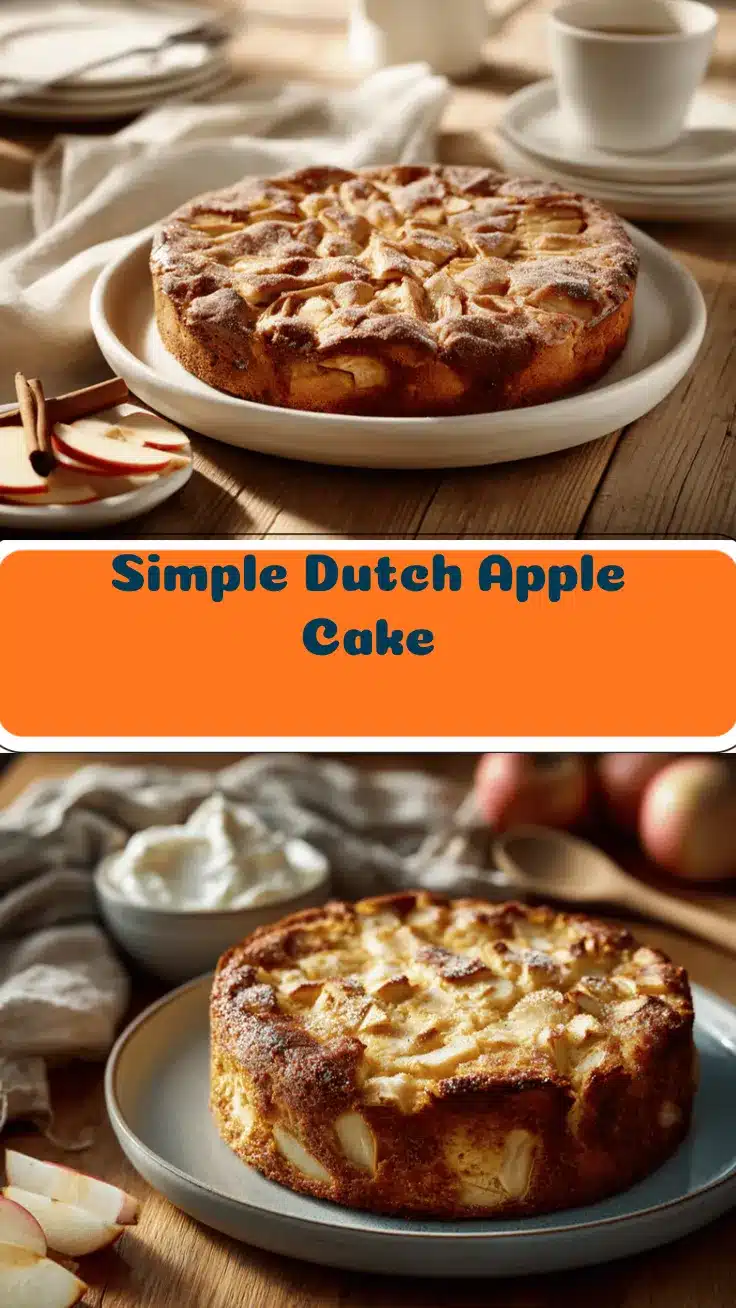
The scent of apples mingling with cinnamon and butter, fresh from the oven, is pure magic. You know that feeling when you walk into a cozy kitchen and it’s like a warm hug? That’s exactly how I’d describe this Dutch Apple Cake recipe. It’s an easy, vintage dessert I keep coming back to, especially when I want something homemade but fuss-free. I first discovered Dutch apple cake in my grandma’s faded recipe book—it was tucked between notes about holiday pies and handwritten tips about “never skimp on the butter!”
I’ll be honest: I’ve baked this Dutch apple cake more times than I can count. Sometimes with extra apples, sometimes with a hint of lemon zest, and yes, occasionally with a secret handful of walnuts. What I love most is how this recipe blends simplicity with nostalgic flavors. It’s great for beginners, busy families, or anyone who wants that classic apple dessert without a million steps. Whether you need a quick treat for your afternoon coffee or a showstopper for brunch, this cake delivers every single time.
As someone who’s tested this Dutch apple cake recipe on rainy Sundays, school bake sales, and even a few last-minute potlucks, I can vouch for its reliability. The batter comes together in a flash, and the apples bake up tender and juicy—plus, you get that golden, slightly crisp top that’s just begging for a dusting of powdered sugar. If you’re craving a homemade dessert that feels like a slice of vintage comfort, you’re in the right place. Let’s get baking!
Why You’ll Love This Dutch Apple Cake Recipe
- Quick & Easy: You can have this Dutch apple cake ready for the oven in under 20 minutes. It’s perfect for those times when you want a homemade treat but don’t want to spend all day in the kitchen.
- Simple Ingredients: No need for fancy flour blends or hard-to-find spices. Most of what you need is probably already in your pantry—think flour, butter, eggs, and fresh apples.
- Perfect for Any Occasion: This Dutch apple cake is just as welcome at a holiday brunch as it is at a casual family dinner. It’s a crowd-pleaser for potlucks, bake sales, or cozy weekends at home.
- Crowd-Pleaser: Kids love the tender apples and sweet cake, while adults appreciate the classic, not-too-sweet flavor. I’ve taken this to gatherings and it’s always gone in a flash!
- Unbelievably Delicious: The combination of juicy apples, buttery cake, and a hint of cinnamon is pure comfort. The texture is moist, yet the topping gets lightly crisp—honestly, it’s hard to stop at one slice.
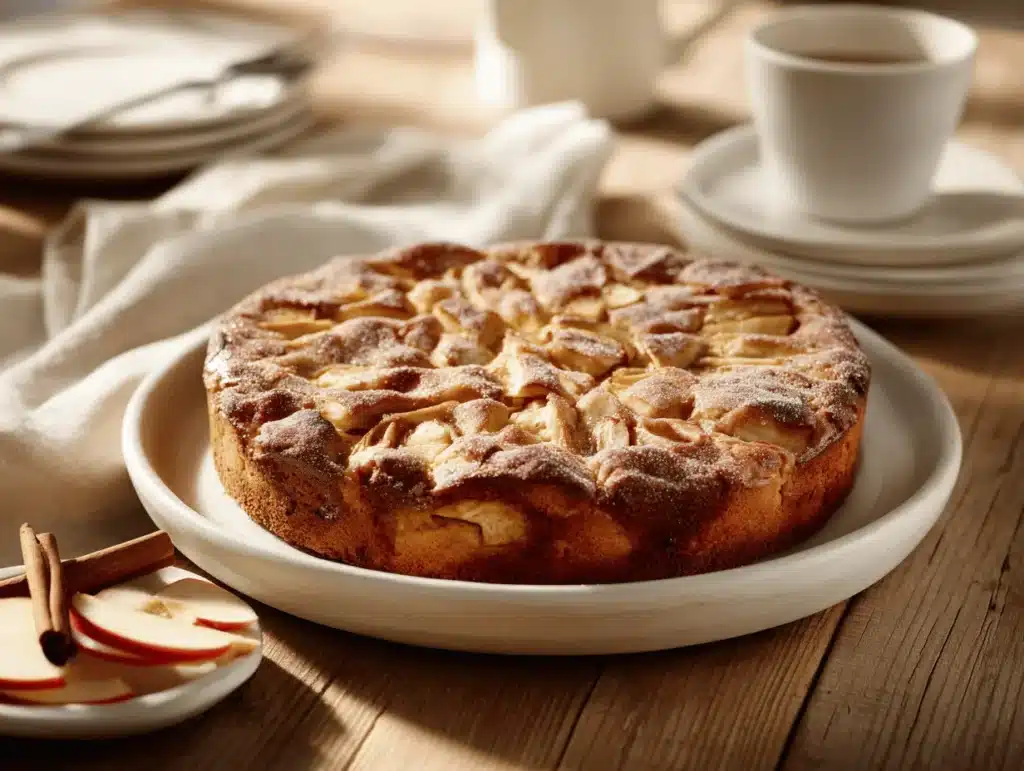
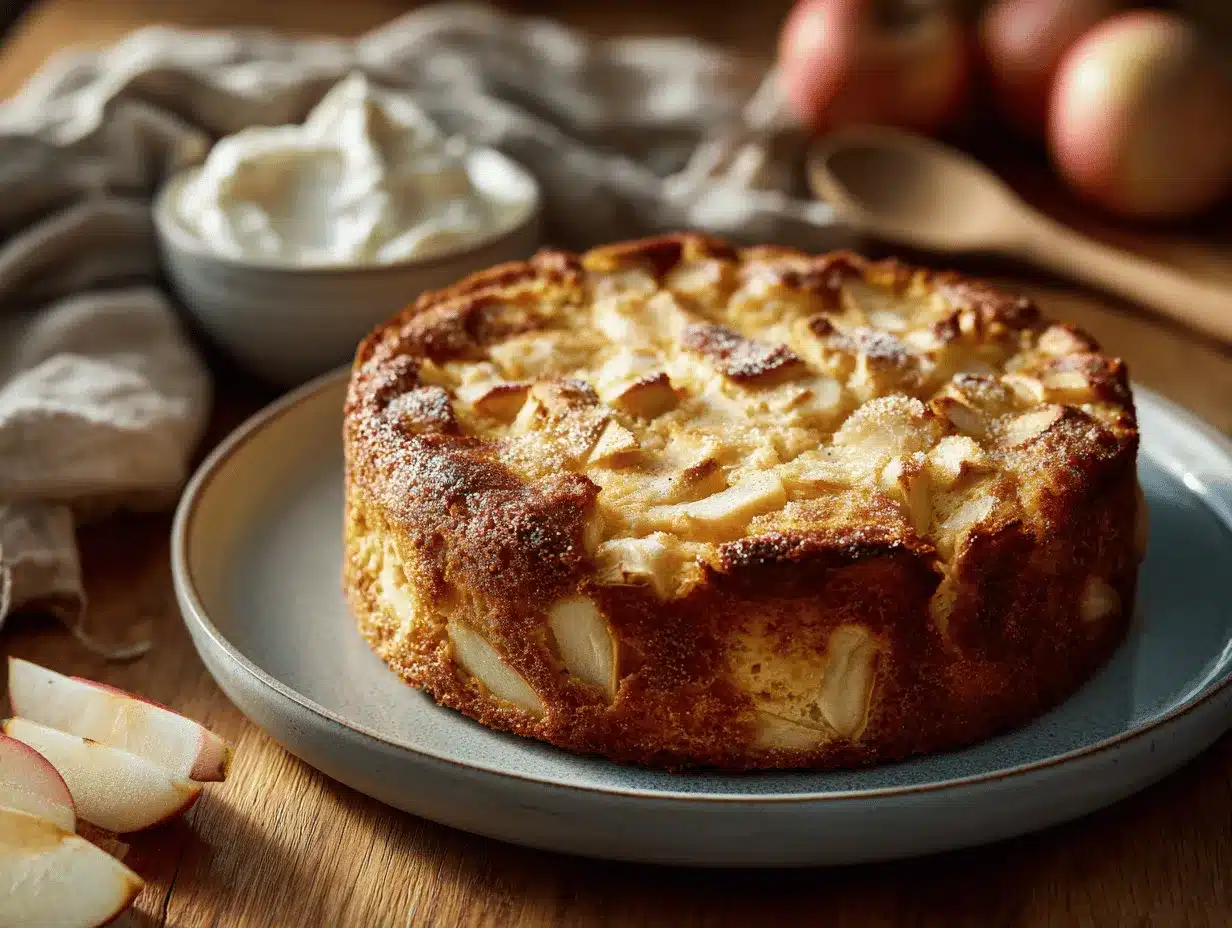
This Dutch apple cake stands out because of its straightforward method and the way the apples are layered right on top, sinking just slightly into the batter as it bakes. That creates a beautiful, rustic finish and ensures every bite is packed with fruit. Plus, there’s no need for mixers—just a bowl, a whisk, and a little elbow grease. The old-fashioned charm comes from the vintage technique (based on my grandma’s recipe), but I’ve tweaked the proportions to make sure it’s foolproof.
It’s not just good—it’s the sort of cake that makes you pause after the first bite. I love that it’s comforting and familiar, but still impressive enough to serve to guests. There’s something about the simplicity that makes it feel special. If you’re searching for an easy homemade vintage dessert, you’ve found your new favorite Dutch apple cake recipe!
Ingredients Needed for Dutch Apple Cake
This Dutch apple cake recipe uses classic, no-nonsense ingredients for bold flavor and satisfying texture. Most are pantry staples, and you can easily swap or adapt to suit your tastes.
- For the Cake Batter:
- 1 1/2 cups (190g) all-purpose flour (for structure and tenderness)
- 1/2 cup (100g) granulated sugar (sweetness, but not too much)
- 1/4 cup (50g) light brown sugar (adds depth and a hint of molasses)
- 1/2 cup (115g) unsalted butter, softened (rich flavor, moist crumb)
- 2 large eggs, room temperature (binds the batter, gives lift)
- 1/2 cup (120ml) whole milk (moisture and richness—use almond milk for dairy-free)
- 1 tsp vanilla extract (flavor boost)
- 2 tsp baking powder (helps the cake rise)
- 1/2 tsp fine sea salt (balances sweetness)
- 1/2 tsp ground cinnamon (warmth and classic apple cake flavor)
- Optional: 1/2 tsp lemon zest (brightens the flavor—especially nice if your apples are sweet)
- For the Apple Topping:
- 2 large apples (about 350g), peeled, cored, and thinly sliced (I love Granny Smith for tartness, but Honeycrisp or Braeburn work great too)
- 2 tbsp granulated sugar (sprinkled over the apples—can sub coconut sugar)
- 1/2 tsp ground cinnamon (for sprinkling)
- Optional: 1 tbsp melted butter (brushed over apples for extra golden finish)
- Optional: handful of chopped walnuts or pecans (adds crunch—my grandma always tossed these on top!)
- For Serving:
- Powdered sugar, for dusting (looks beautiful and adds a touch of sweetness)
- Whipped cream or vanilla ice cream (optional, but let’s face it—who doesn’t love a little extra indulgence?)
Ingredient notes: I recommend King Arthur or Bob’s Red Mill flour for consistent results. For apples, choose firm varieties that hold their shape. If you need gluten-free, swap the flour for a 1:1 gluten-free blend (I’ve had good luck with Cup4Cup). For a dairy-free version, use vegan butter and plant-based milk. You can also amp up the spice with a pinch of nutmeg if you like!
Equipment Needed
- 9-inch (23cm) round cake pan or springform pan (for easy removal—parchment paper helps!)
- Mixing bowls (medium for batter, small for apples)
- Whisk and wooden spoon (no fancy mixer needed!)
- Peeler and corer for apples (a paring knife works if you don’t have one)
- Measuring cups and spoons (accuracy matters—digital scale is even better)
- Rubber spatula (for scraping every last bit of batter)
- Wire rack (for cooling, keeps the bottom from getting soggy)
If you don’t have a springform pan, a regular cake pan will do—just line it with parchment for easy removal. I’ve baked this Dutch apple cake in a glass pie dish when I was short on pans, and it worked out fine (the edges were a little more crisp, which I secretly loved). For cleanup, I always rinse my peeler and whisk right away—makes life easier. If you’re on a budget, basic tools do the trick—no need for anything fancy, promise!
Preparation Method – How to Make Dutch Apple Cake
- Prep the Pan and Apples (5 minutes):
- Preheat your oven to 350°F (175°C). Grease a 9-inch (23cm) round cake pan and line the bottom with parchment paper.
- Peel, core, and thinly slice the apples. Toss them gently with 2 tbsp sugar and 1/2 tsp cinnamon in a bowl. Set aside. (Apples should be about 1/8 inch thick—too thick, and they won’t soften enough.)
- Make the Batter (10 minutes):
- In a medium bowl, whisk together flour, baking powder, salt, and 1/2 tsp cinnamon.
- In a large bowl, cream the softened butter with the granulated and brown sugar until light and fluffy (about 2 minutes—use a whisk or wooden spoon).
- Add eggs, one at a time, beating well after each addition. Stir in the vanilla extract and optional lemon zest.
- Add half the dry ingredients, then half the milk, stirring gently. Repeat with remaining flour mixture and milk until just combined. (Don’t overmix—batter should be thick but smooth.)
- Assemble the Cake (3 minutes):
- Spread the batter evenly into your prepared pan—use a spatula to smooth the surface.
- Arrange the apple slices on top in overlapping circles, gently pressing them into the batter. (It’s okay if they sink a bit; that’s the charm!)
- Brush apples with melted butter if using, and sprinkle with extra cinnamon and sugar. Toss on nuts if desired.
- Bake (35-40 minutes):
- Bake on the middle rack for 35-40 minutes, until the cake is golden and a toothpick inserted into the center comes out mostly clean (a few moist crumbs are fine).
- If the edges brown too quickly, cover loosely with foil during the last 10 minutes.
- The cake should smell buttery and spicy—your kitchen will feel like autumn!
- Cool and Serve (15 minutes):
- Let the cake cool in the pan for 10 minutes, then run a knife around the edge and turn out onto a wire rack.
- Cool another 10-15 minutes before slicing. Dust with powdered sugar and serve warm or at room temperature.
Troubleshooting Tips: If the apples seem dry during baking, brush on a little more melted butter. If the cake sinks in the middle, it may be underbaked—test with a toothpick. If your apples release a lot of juice, blot slices with a paper towel before layering.
Personal tip: I usually slice the apples slightly thicker for extra texture, and sometimes I sneak in a sprinkle of flaky sea salt before baking—trust me, it’s a game changer!
Cooking Tips & Techniques for Dutch Apple Cake
Here’s what I’ve learned after countless Dutch apple cake baking sessions (and, let’s be real, a couple of flops!):
- Room Temperature Ingredients: Butter and eggs blend better when not cold. Your batter will be smoother, and your cake will rise evenly.
- Don’t Overmix: Stir just until the flour disappears. Overworking the batter can make your cake dense—been there, regretted that.
- Apple Placement: Overlapping the slices gives a beautiful look and helps distribute moisture. If you pile too high, the cake may bake unevenly, so stick to one layer.
- Spice it Up: A pinch of nutmeg or cardamom can add a subtle twist. I once got carried away with cinnamon, and while it smelled amazing, the spice overpowered the apples—balance is key.
- Baking Time: Ovens can be sneaky. Check at the 35-minute mark. If the edges are golden but the center jiggles, give it a few more minutes. For best results, rotate the pan halfway through.
- Multitasking: While the cake bakes, whip up some fresh cream or set out your coffee cups. It’s the perfect time to tidy up and get ready for that first slice.
Consistency is all about measuring accurately. I always recommend using a digital scale if you have one. And if you’re unsure about apple varieties, Granny Smith is usually a safe bet—tart, firm, and doesn’t turn mushy. The cake is forgiving, but a light touch with the batter and careful layering of apples make all the difference.
Most of all, don’t stress if it’s not picture-perfect. Some of my best Dutch apple cakes were a little rustic looking. The flavor always wins!
Variations & Adaptations
Dutch apple cake is a classic, but there’s plenty of room to make it your own. Here are some fun ways to switch it up:
- Gluten-Free: Use a 1:1 gluten-free flour blend. I like Cup4Cup or King Arthur. The result is just as tender—maybe even a bit more crumbly, but honestly still delicious.
- Vegan Option: Swap butter for vegan spread, eggs for flax eggs (1 tbsp ground flax + 2.5 tbsp water per egg), and plant-based milk. My friend tried it this way and gave it two thumbs up!
- Seasonal Twist: In summer, swap apples for firm peaches or nectarines. In the fall, try mixing apples with fresh cranberries for a tart burst.
- Nutty Crunch: Add a handful of chopped pecans or walnuts to the topping. It’s a nostalgic touch from my grandma’s original recipe.
- Spice Blends: Go beyond cinnamon—try pumpkin pie spice or add a dash of ginger for a little heat.
- Flavor Preferences: If you like things less sweet, reduce the sugar by 2 tbsp. For a richer flavor, use brown butter instead of regular butter.
Allergen note: For nut allergies, skip the nuts or use sunflower seeds for crunch. If dairy is an issue, coconut oil works as a sub for butter. I’ve made a version with oat milk, and it was soft and lovely.
My personal favorite? Mixing half apples and half pears in the topping for a subtle, floral sweetness. It’s a little unexpected and always gets rave reviews!
Serving & Storage Suggestions
This Dutch apple cake is best served slightly warm or at room temperature. I like to dust it with powdered sugar right before serving—it gives that “fresh from the bakery” look that’s perfect for Pinterest photos!
- Serving: Slice into wedges and offer with a dollop of whipped cream or vanilla ice cream. It pairs beautifully with hot coffee, chai, or a mug of apple cider.
- Presentation: For brunch, cut into squares and arrange on a platter. Add a sprinkle of cinnamon across the top for extra visual appeal.
- Storage: Store leftovers in an airtight container at room temperature for up to 2 days. For longer storage, refrigerate for up to 5 days. The cake stays moist, but the apples may soften a bit more—still delicious!
- Freezing: Wrap slices individually and freeze for up to 2 months. Thaw overnight in the fridge or reheat gently in a low oven (300°F/150°C) for 10-12 minutes.
- Flavor Development: The spices deepen after a day or two. Sometimes I think this cake tastes even better on day two!
Honestly, if you manage to have leftovers, you’re stronger than me. I always sneak an extra slice with my morning coffee!
Nutritional Information & Benefits
Each serving of Dutch apple cake (based on 10 slices) is approximately:
- Calories: 230
- Fat: 8g
- Carbohydrates: 36g
- Protein: 4g
- Fiber: 2g
- Sugar: 20g
Apples are rich in fiber and vitamin C. Using fresh fruit means you get some natural antioxidants and a touch of sweetness without relying on lots of sugar. If you use whole wheat flour, you’ll bump up the fiber even more. For gluten-free or low-carb diets, swap for your preferred blends. This Dutch apple cake contains dairy (butter, milk), eggs, and optional nuts—so check for allergens if needed.
From a wellness perspective, I love that this recipe celebrates real ingredients. It’s a treat, but not overly indulgent. For me, dessert is about balance and enjoying old-fashioned flavors with a modern twist.
Conclusion
So, why try this Dutch apple cake recipe? Because it’s a timeless, foolproof dessert that brings joy with every bite. It’s easy, reliable, and endlessly adaptable—perfect for busy families, beginner bakers, or anyone craving a taste of vintage comfort. The apples bake up tender, the cake is buttery and light, and you can customize it to suit your mood or pantry.
I come back to this recipe whenever I want something nostalgic but not complicated. If you make it, please let me know your favorite twist—did you add pears, use gluten-free flour, or sneak in some nuts? Drop a comment below, share on Pinterest, or tag me if you post a photo. Honestly, seeing your versions is my favorite part of food blogging!
Go ahead and bake a slice of history. You’ll love how easy and delicious this Dutch apple cake is—promise!
FAQs
Can I use different types of apples for Dutch apple cake?
Absolutely! Granny Smith, Honeycrisp, Braeburn, or Fuji all work well. Tart apples hold their shape best, but use what you have on hand.
How do I keep my apple cake from becoming soggy?
Slice apples thinly and blot with a paper towel if they’re very juicy. Don’t pile them too thick, and bake until the edges are golden.
Can I make Dutch apple cake ahead of time?
Yes, you can bake it a day before serving. Store covered at room temperature or refrigerate for up to five days—just bring to room temperature or warm gently before serving.
How do I make this recipe gluten-free?
Swap the all-purpose flour for a 1:1 gluten-free baking blend. Most blends work well—just avoid mixes with bean flours, which can be strong-tasting.
What’s the best way to serve Dutch apple cake?
I love it slightly warm, dusted with powdered sugar, and served with whipped cream or vanilla ice cream. It’s great for brunch, dessert, or even a sneaky breakfast treat!
Pin This Recipe!
Dutch Apple Cake
- Total Time: 55 minutes
- Yield: 10 servings 1x
Description
This easy, vintage Dutch Apple Cake is a comforting homemade dessert featuring tender apples, buttery cake, and a hint of cinnamon. It’s quick to prepare and perfect for brunch, potlucks, or cozy family gatherings.
Ingredients
- 1 1/2 cups all-purpose flour
- 1/2 cup granulated sugar
- 1/4 cup light brown sugar
- 1/2 cup unsalted butter, softened
- 2 large eggs, room temperature
- 1/2 cup whole milk
- 1 tsp vanilla extract
- 2 tsp baking powder
- 1/2 tsp fine sea salt
- 1/2 tsp ground cinnamon
- Optional: 1/2 tsp lemon zest
- 2 large apples (about 12 oz), peeled, cored, and thinly sliced
- 2 tbsp granulated sugar (for topping)
- 1/2 tsp ground cinnamon (for topping)
- Optional: 1 tbsp melted butter (for brushing apples)
- Optional: handful of chopped walnuts or pecans
- Powdered sugar, for dusting
- Whipped cream or vanilla ice cream, for serving (optional)
Instructions
- Preheat oven to 350°F (175°C). Grease a 9-inch round cake pan and line the bottom with parchment paper.
- Peel, core, and thinly slice apples. Toss with 2 tbsp sugar and 1/2 tsp cinnamon in a bowl. Set aside.
- In a medium bowl, whisk together flour, baking powder, salt, and 1/2 tsp cinnamon.
- In a large bowl, cream softened butter with granulated and brown sugar until light and fluffy (about 2 minutes).
- Add eggs one at a time, beating well after each addition. Stir in vanilla extract and optional lemon zest.
- Add half the dry ingredients, then half the milk, stirring gently. Repeat with remaining flour mixture and milk until just combined. Do not overmix.
- Spread batter evenly into prepared pan and smooth the surface.
- Arrange apple slices on top in overlapping circles, gently pressing into the batter.
- Brush apples with melted butter if using, and sprinkle with extra cinnamon and sugar. Add nuts if desired.
- Bake on middle rack for 35-40 minutes, until golden and a toothpick inserted in the center comes out mostly clean.
- If edges brown too quickly, cover loosely with foil during last 10 minutes.
- Let cake cool in pan for 10 minutes, then run a knife around the edge and turn out onto a wire rack.
- Cool another 10-15 minutes before slicing. Dust with powdered sugar and serve warm or at room temperature.
Notes
Use firm apples like Granny Smith or Honeycrisp for best texture. For gluten-free, substitute a 1:1 gluten-free flour blend. For dairy-free, use vegan butter and plant-based milk. Add nuts for crunch or a pinch of nutmeg for extra spice. Cake is best served warm and can be stored at room temperature for 2 days or refrigerated for up to 5 days. Freeze slices for up to 2 months.
- Prep Time: 15 minutes
- Cook Time: 40 minutes
- Category: Dessert
- Cuisine: Dutch
Nutrition
- Serving Size: 1 slice (1/10 of cake)
- Calories: 230
- Sugar: 20
- Sodium: 180
- Fat: 8
- Saturated Fat: 5
- Carbohydrates: 36
- Fiber: 2
- Protein: 4
Keywords: Dutch apple cake, apple dessert, vintage cake, easy apple cake, homemade cake, brunch cake, fall dessert, cinnamon apple cake