Introduction
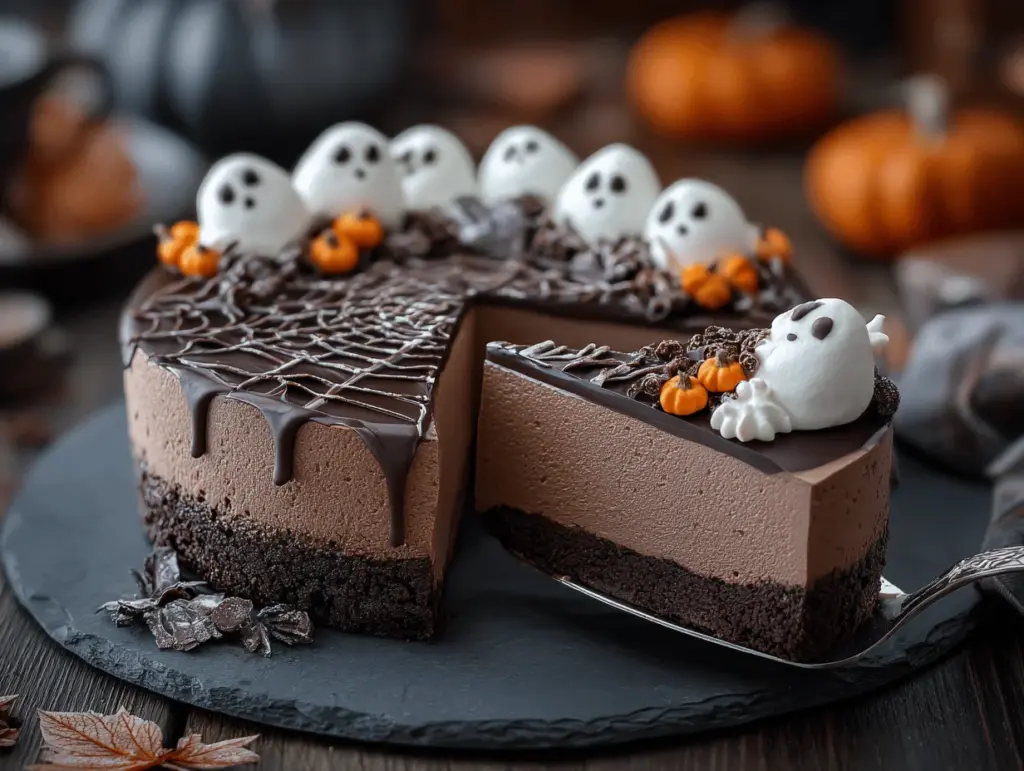
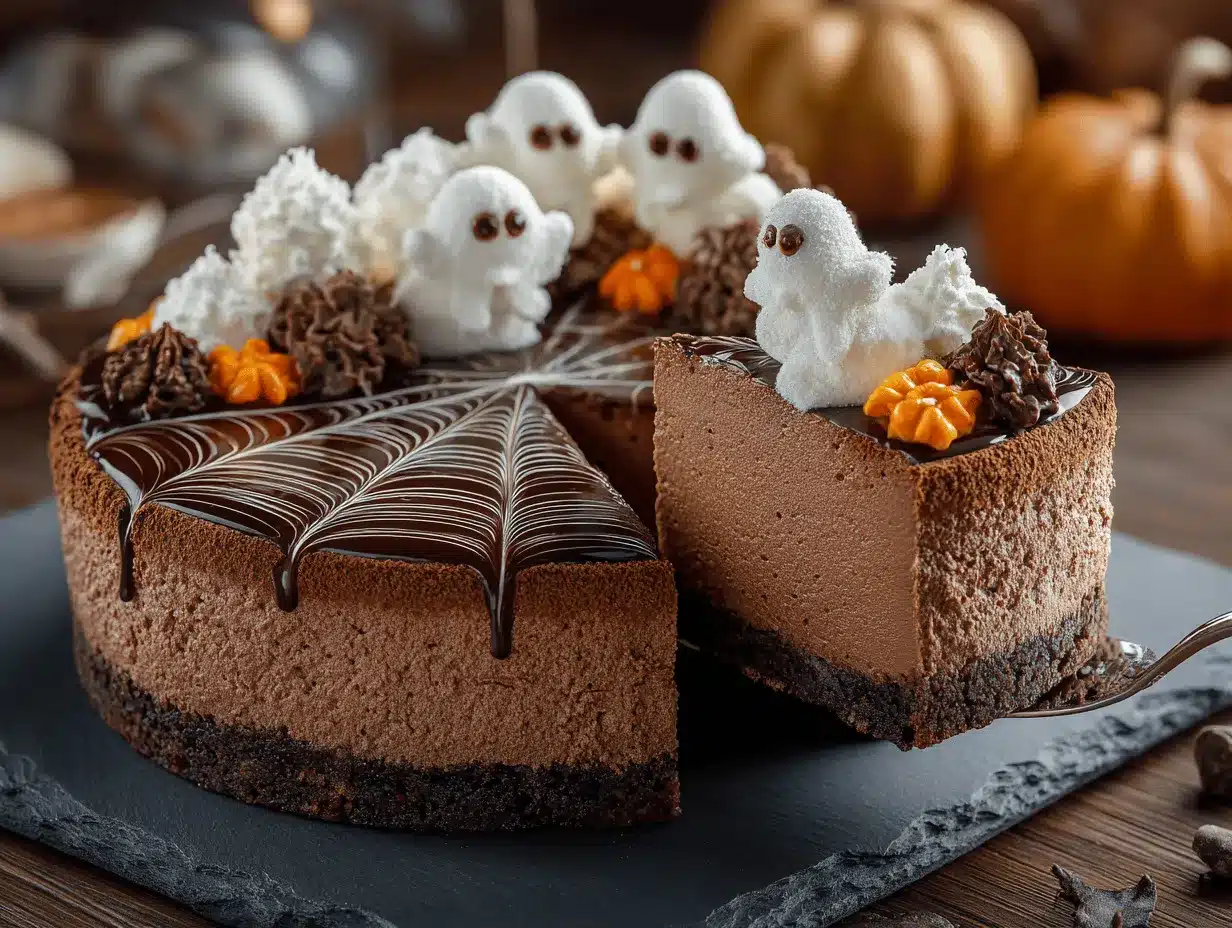
The first time I pulled a Halloween chocolate mousse cake out of the fridge, the glossy top shimmered under the kitchen light—almost too spooky to slice! The deep, rich chocolate aroma had my kids tiptoeing around, pretending to be ghosts (honestly, this cake brings out everyone’s silly side). If you’re hunting for a showstopper Halloween dessert that’s easy, looks festive, and tastes like pure chocolate heaven, this is it.
I stumbled onto this recipe after a disastrous attempt at making a haunted graveyard sheet cake. It was a mess—crumbling tombstones, gummy worms sliding off—so I switched gears and tried chocolate mousse instead. Best decision ever. Now, every October, this Halloween chocolate mousse cake makes an appearance at our party table, decked out in edible “spiderwebs” and candy eyes.
What I love most is how it balances decadence with a light mousse texture. It’s rich but not heavy, and those spooky decorations? They’re easy (even if you’re not a pro). Whether you’re hosting a crowd or just want a treat for a cozy night in, this cake delivers. Plus, you can prep it ahead and decorate with the kids—perfect for busy families or anyone wanting to add some fun to their Halloween spread. I’ve made this recipe a dozen times and tested every shortcut and trick, so you know you’re getting the real deal.
If you’re ready to wow your friends with a Halloween chocolate mousse cake that’s as spooky as it is scrumptious, read on! Trust me, it’s easier than it looks—and way more fun.
Why You’ll Love This Recipe
- Quick & Easy: Comes together in under 45 minutes (plus chilling), so you can actually enjoy your party prep.
- Simple Ingredients: You probably have most of what you need—no mysterious Halloween-only products or hard-to-find stuff.
- Perfect for Parties: This Halloween chocolate mousse cake is made for sharing. Slice it up for a crowd, or serve as a centerpiece for your spooky dessert table.
- Crowd-Pleaser: Every age loves it. Kids dig the fun decorations; adults appreciate the rich chocolate flavor. I’ve had teens and grown-ups ask for seconds.
- Unbelievably Delicious: The mousse is creamy and intense, layered over a soft chocolate cake base. It’s the kind of cake that gets you those “recipe please!” texts.
What sets this apart? I blend the mousse until ultra-smooth, then chill it for a texture that’s somewhere between fluffy and luxurious. Some recipes use gelatin or shortcuts, but I stick to real chocolate and whipped cream for authentic flavor. And decorating is a blast—pipe on “webs,” toss on candy eyeballs, or let the kids go wild with orange sprinkles. The best part? This cake isn’t just a novelty—it’s genuinely delicious. It’s comfort food, but with a spooky twist.
Perfect for Halloween parties, family movie nights, or even just treating yourself after a long week. It’s a dessert that’s both impressive and approachable. If you’re nervous about making mousse, don’t be. I’ve broken the steps down so anyone can do it, and you’ll feel like a kitchen magician when you see the finished cake.
What Ingredients You Will Need
This Halloween chocolate mousse cake is all about using classic, reliable ingredients for maximum flavor and a showstopping look. Here’s what you’ll need (and a few tips for getting the best results):
- For the Cake Base:
- 1 cup (120g) all-purpose flour
- 1/2 cup (60g) unsweetened cocoa powder (Dutch-process gives a richer color)
- 1 cup (200g) granulated sugar
- 1/2 teaspoon baking powder
- 1/4 teaspoon baking soda
- 1/4 teaspoon salt
- 2 large eggs, room temperature
- 1/2 cup (120ml) milk (whole milk preferred)
- 1/4 cup (60ml) vegetable oil (canola works too)
- 1 teaspoon vanilla extract
- 1/2 cup (120ml) hot water (helps bloom the cocoa)
- For the Chocolate Mousse:
- 7 oz (200g) bittersweet chocolate, chopped (I like Ghirardelli or Lindt for flavor)
- 2 cups (480ml) heavy whipping cream, cold
- 1/4 cup (30g) powdered sugar
- 1 teaspoon vanilla extract
- Pinch of salt
- For Spooky Decorations:
- White chocolate chips or candy melts (for spiderwebs)
- Candy eyeballs (store-bought or homemade)
- Orange, black, or purple sprinkles
- Optional: gummy worms, mini marshmallows, chocolate sticks
If you’re gluten-free, swap the flour for a 1:1 gluten-free blend. Dairy-free? Use coconut cream and a vegan chocolate bar. For a less sweet cake, reduce sugar by 2 tablespoons. I always look for shiny, fresh chocolate—skip the old baking bars from last year’s pantry cleanout. For the mousse, make sure your cream is cold (it whips up fluffier, trust me). And those decorations? Get creative! Let the kids pick their favorites.
Everything here is easy to find at most grocery stores. You don’t need fancy bake shop ingredients. I’ve tried this with generic brands and premium ones—both work, but the better chocolate does make a difference. If you want to go all out, grab some edible glitter for extra Halloween sparkle!
Equipment Needed
- 9-inch (23cm) springform pan (helps with easy unmolding; a regular cake pan works but may need parchment lining)
- Electric mixer (hand or stand mixer—whipping cream by hand is a workout!)
- Heatproof bowl (for melting chocolate, glass or metal)
- Microwave or double boiler (for melting chocolate—microwave works if you go slow)
- Spatula (for folding mousse and scraping bowls)
- Whisk (if you don’t have a mixer, but honestly, a mixer is faster)
- Piping bag or zip-top bag (for spiderwebs and decorating)
- Offset spatula (helps with smooth mousse layer, but a regular butter knife works in a pinch)
I’ve used all sorts of pans—springform is easiest for mousse cakes, but you can get away with a regular round cake pan if you line it well. If you’re short on gadgets, a sturdy whisk and some elbow grease will do. For decorating, a zip-top bag with the corner snipped works just fine; don’t bother buying fancy piping tips unless you really want to. Pro tip: keep your mixer’s whisk attachment in the freezer for 10 minutes before whipping cream—it makes the process super speedy.
If you’re on a budget, skip the specialty tools. Most dollar stores have basic spatulas and whisks that work. Just make sure your pan is leak-proof (learned that the hard way—chocolate mousse everywhere!).
Preparation Method
- Prep the Pan: Grease a 9-inch (23cm) springform pan and line the bottom with parchment. (If you use a regular cake pan, line the sides too for easy unmolding.)
- Make the Cake Base: Preheat oven to 350°F (175°C). In a large bowl, sift together flour, cocoa powder, sugar, baking powder, baking soda, and salt. In another bowl, whisk eggs, milk, oil, and vanilla. Pour wet ingredients into dry, mixing gently until just combined. Stir in hot water (the batter will be thin—don’t panic!).
- Bake: Pour batter into prepared pan. Bake for 22-25 minutes, until a toothpick inserted comes out with a few moist crumbs. Cool completely in pan. (Warm cake will melt your mousse—been there, done that.)
- Melt the Chocolate: Place chopped bittersweet chocolate in a heatproof bowl. Microwave in 30-second bursts, stirring until smooth (or use a double boiler). Let cool to room temperature, but not so cool it hardens.
- Whip the Cream: In a chilled bowl, whip heavy cream, powdered sugar, vanilla, and salt until stiff peaks form. (Don’t over-whip—stop when it holds a peak but isn’t grainy.)
- Make the Mousse: Gently fold cooled melted chocolate into whipped cream, using a spatula. Work slowly—fold, don’t stir, to keep it airy. It should look light, fluffy, and shiny. Taste test for sweetness; add a bit more sugar if you like.
- Layer the Mousse: Spread mousse evenly over cooled cake base in the pan. Smooth with an offset spatula or butter knife. Tap pan gently on the counter to level out.
- Chill: Refrigerate at least 3 hours, or overnight, until mousse is set and cake is firm. (If you’re short on time, pop it in the freezer for 1 hour, but watch for ice crystals.)
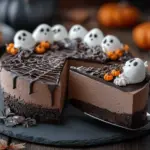
- Decorate: Melt white chocolate chips or candy melts. Scoop into a piping bag or zip-top bag, snip a tiny corner, and pipe spiderwebs across the cake. Add candy eyeballs, sprinkles, or spooky candies. Let the kids go wild—imperfections just add character!
- Unmold & Serve: Run a thin knife around the edge before releasing pan. Transfer cake to serving platter. Slice with a hot, dry knife for clean pieces.
Notes: If your mousse looks grainy, the chocolate was probably too hot or cold—let the cream and chocolate come to similar temps before combining. For extra chocolate flavor, add a tablespoon of espresso powder to the cake batter. If you want a taller cake, double the mousse layer (I’ve done this for big parties—it’s a hit!).
Sensory cues: The cake base should smell deeply chocolatey and be springy to the touch. The mousse is glossy, light, and holds its shape. (Sneak a spoonful—no judgment!)
Efficiency tip: Make the cake base a day ahead, wrap in plastic, and mousse/decorate the next day. Keeps party day stress to a minimum!
Cooking Tips & Techniques
Let’s face it, chocolate mousse can be a little intimidating if you’ve never made it before. The secret is all about temperature and gentle handling. Here are my top tips, learned from a few “oops” moments:
- Don’t Overbake: The cake base should be moist—check at 22 minutes. If it’s too dry, the mousse won’t meld nicely.
- Chocolate Temperature: Melted chocolate should be cool but still fluid. If it’s hot, it’ll deflate the whipped cream and turn grainy (trust me, I’ve botched this step before!).
- Whipping Cream: Use cold cream and a chilled bowl. Warm cream won’t whip up thick enough, and your mousse will be runny.
- Folding Technique: Fold, don’t stir! Use a spatula and cut through the cream, lift, and turn. This keeps the mousse fluffy.
- Decorating: If you’re new to piping, practice on parchment first. Spiderwebs don’t need to be perfect—wobbly lines look creepy!
- Multitasking: While the cake base bakes, melt your chocolate and prep the decorations. Saves time and keeps things moving.
- Troubleshooting: If your mousse splits, add a splash of cold cream and gently fold. It usually comes back together.
- Consistency: Chill mousse well before slicing. If you rush, it’ll squish out the sides (learned this the hard way at last year’s party!).
Common mistakes? Overmixing the mousse, rushing the chilling, or using low-quality chocolate. Take your time, use good ingredients, and remember—it’s Halloween! Spooky decorations hide a lot of kitchen sins.
Variations & Adaptations
One of the best things about this Halloween chocolate mousse cake is how easy it is to customize. Here are my top takes:
- Gluten-Free: Swap all-purpose flour for a gluten-free blend. Check labels on chocolate and decorations for hidden gluten.
- Dairy-Free: Use coconut cream for the mousse and a dairy-free chocolate bar. Almond, oat, or soy milk works in the cake base, too.
- Seasonal Flavors: Fold 1/2 teaspoon pumpkin spice into the cake batter or mousse for a fall twist. Or add orange zest for a chocolate-orange vibe.
- Different Cooking Methods: You can bake the cake base in cupcake tins for mini mousse cakes (perfect for party portions!).
- Nut-Free: Double-check all ingredients and use nut-free chocolate if allergies are a concern.
- Personal Twist: Last Halloween, I added crushed Oreos between the cake and mousse layers for a “graveyard” effect—big hit with the kids. Try adding candy corn or mini chocolate chips for extra texture.
Want a lighter version? Use half the cream in the mousse and fold in whipped aquafaba (chickpea liquid) for a vegan, airy texture. If you love a boozy kick, add a tablespoon of coffee liqueur to the mousse (adults only!).
Honestly, this cake is a blank canvas—make it as wild or as classic as you like!
Serving & Storage Suggestions
This cake shines when served chilled, straight from the fridge. Slice it with a hot, dry knife for perfect edges and wipe between cuts. Present it on a black or orange platter for extra Halloween flair—scatter candy eyeballs or mini pumpkins around the base for a Pinterest-worthy photo.
Pair with mugs of hot cocoa, spooky punch, or a scoop of vanilla ice cream. Want to go all out? Serve alongside savory Halloween snacks like mummy hot dogs or pumpkin soup for a full party spread.
Storage is easy: wrap leftovers tightly in plastic wrap and refrigerate for up to 4 days. The mousse actually firms up overnight, making flavors deeper and the texture even more velvety. For longer storage, freeze slices individually (wrap well!) for up to 1 month. Thaw overnight in the fridge—don’t microwave or the mousse will melt.
Reheat cake base if you want (just a quick zap in the microwave), but never reheat the mousse layer. It’s meant to be cold and creamy! Honestly, I love sneaking a slice the morning after—it’s even better once the flavors settle.
Nutritional Information & Benefits
Here’s a rough breakdown for one slice (1/12 of the cake):
- Calories: ~320
- Fat: ~22g
- Carbs: ~32g
- Protein: ~4g
- Fiber: ~3g (thanks to cocoa powder)
This Halloween chocolate mousse cake is rich, but you get some benefits from real chocolate—antioxidants, a little boost of magnesium, and happiness (yes, chocolate really does that!). Heavy cream brings calcium, and you can lighten things up with lower-fat swaps if needed.
Allergy notes: Contains dairy, eggs, and wheat (unless you use the gluten-free/dairy-free adaptations above). Always check your decorations for allergens—some candy eyes contain traces of nuts or gluten.
On busy party weeks, I like knowing this cake is a treat that’s not loaded with artificial stuff. Real ingredients, real flavor, and a little extra joy for everyone who gets a slice.
Conclusion
If you’re looking for a Halloween dessert that’s spooky, fun, and absolutely delicious, this Halloween chocolate mousse cake is the answer. It’s easy enough for beginners, impressive enough for parties, and always a hit with both kids and adults. The mousse is creamy, the cake is rich, and the decorations can be as wild as you want—honestly, there’s no wrong way to make it.
I love this recipe because it’s become part of our family traditions—every October, we get creative with toppings and laugh at our “spooky” cake fails. Whether you stick to the classic or try one of the variations, you’ll end up with a dessert that’s memorable and mouthwatering.
Give it a try, share your own twists, and let me know how it goes in the comments! If you post a photo on Pinterest, tag me—I love seeing everyone’s spooky creations. Happy haunting and happy baking!
FAQs
Can I make the Halloween chocolate mousse cake ahead of time?
Absolutely! You can bake the cake base and whip up the mousse a day ahead. Just store in the fridge and decorate right before serving.
How do I get clean slices of mousse cake?
Use a hot, dry knife and wipe it between cuts. This helps the mousse stay neat and doesn’t drag decorations down.
Can I freeze leftovers?
Yes! Wrap individual slices tightly and freeze for up to a month. Thaw overnight in the fridge—never microwave the mousse layer.
What if my mousse turns grainy?
This usually happens if the chocolate is too hot. Let both chocolate and whipped cream come to room temp before combining, and fold gently.
Can I use store-bought cake mix as the base?
Totally! If you’re short on time, a boxed chocolate cake works well. Just bake as directed and top with homemade mousse.
Pin This Recipe!
Halloween Chocolate Mousse Cake
- Total Time: 45 minutes (plus 3 hours chilling)
- Yield: 12 servings 1x
Description
A decadent yet light chocolate mousse cake with a rich cake base, topped with creamy mousse and spooky Halloween decorations. Perfect for parties, family gatherings, or a festive treat that’s easy to make and fun to decorate.
Ingredients
- 1 cup all-purpose flour
- 1/2 cup unsweetened cocoa powder (Dutch-process preferred)
- 1 cup granulated sugar
- 1/2 teaspoon baking powder
- 1/4 teaspoon baking soda
- 1/4 teaspoon salt
- 2 large eggs, room temperature
- 1/2 cup whole milk
- 1/4 cup vegetable oil (or canola oil)
- 1 teaspoon vanilla extract
- 1/2 cup hot water
- 7 oz bittersweet chocolate, chopped
- 2 cups heavy whipping cream, cold
- 1/4 cup powdered sugar
- 1 teaspoon vanilla extract
- Pinch of salt
- White chocolate chips or candy melts (for spiderwebs)
- Candy eyeballs
- Orange, black, or purple sprinkles
- Optional: gummy worms, mini marshmallows, chocolate sticks
Instructions
- Grease a 9-inch springform pan and line the bottom with parchment paper. (If using a regular cake pan, line the sides as well.)
- Preheat oven to 350°F (175°C). In a large bowl, sift together flour, cocoa powder, sugar, baking powder, baking soda, and salt.
- In another bowl, whisk eggs, milk, oil, and vanilla extract. Pour wet ingredients into dry ingredients and mix gently until just combined.
- Stir in hot water; the batter will be thin.
- Pour batter into prepared pan and bake for 22-25 minutes, until a toothpick inserted comes out with a few moist crumbs. Cool completely in pan.
- Place chopped bittersweet chocolate in a heatproof bowl. Microwave in 30-second bursts, stirring until smooth (or use a double boiler). Let cool to room temperature.
- In a chilled bowl, whip heavy cream, powdered sugar, vanilla, and salt until stiff peaks form.
- Gently fold cooled melted chocolate into whipped cream using a spatula. Fold slowly to keep it airy.
- Spread mousse evenly over cooled cake base in the pan. Smooth with an offset spatula or butter knife. Tap pan gently to level.
- Refrigerate at least 3 hours, or overnight, until mousse is set and cake is firm. (Or freeze for 1 hour, watching for ice crystals.)
- Melt white chocolate chips or candy melts. Scoop into a piping bag or zip-top bag, snip a tiny corner, and pipe spiderwebs across the cake. Add candy eyeballs, sprinkles, or other spooky candies.
- Run a thin knife around the edge before releasing pan. Transfer cake to serving platter. Slice with a hot, dry knife for clean pieces.
Notes
For gluten-free, use a 1:1 gluten-free flour blend. For dairy-free, substitute coconut cream and vegan chocolate. Chill mousse well before slicing for best texture. Practice piping spiderwebs on parchment first. Make cake base a day ahead for easy party prep. Use high-quality chocolate for best flavor. If mousse splits, add a splash of cold cream and gently fold.
- Prep Time: 20 minutes
- Cook Time: 25 minutes
- Category: Dessert
- Cuisine: American
Nutrition
- Serving Size: 1 slice (1/12 of cake)
- Calories: 320
- Sugar: 22
- Sodium: 180
- Fat: 22
- Saturated Fat: 13
- Carbohydrates: 32
- Fiber: 3
- Protein: 4
Keywords: Halloween dessert, chocolate mousse cake, spooky cake, party dessert, kid-friendly, easy Halloween recipe, chocolate cake, mousse, festive, make ahead